

In this article, we will take a look at CORS issues in Angular application, what it is, when it occurs, and how to tackle them. We will also look at how to configure local and remote scenarios to support CORS. The accompanying code is also provided on Github.
Table of Contents
CORS: Cross-Origin Resource Sharing
If you are into web technologies, then CORS may be a familiar term to you. To those who are new to it, it is a browser mechanism that enables controlled access to resources located outside of a given domain. It extends and adds flexibility to the same-origin policy (SOP) and adds resource-sharing capabilities to the browser sessions allowing only a set of “trusted” origins to access data. Visual learner? Check out a video on the topic from Dev Academy.
Angular web applications are mostly decoupled and are deployed in their own containers, and the backend application servers and databases may have different origins.
These front-end applications communicate with the backend server over the HTTP protocol, where they exchange prescribed headers to allow for the download or upload of data. CORS uses these HTTP Headers collection to enforce its specifications. The most important header is the access control that allows the origin policy header.
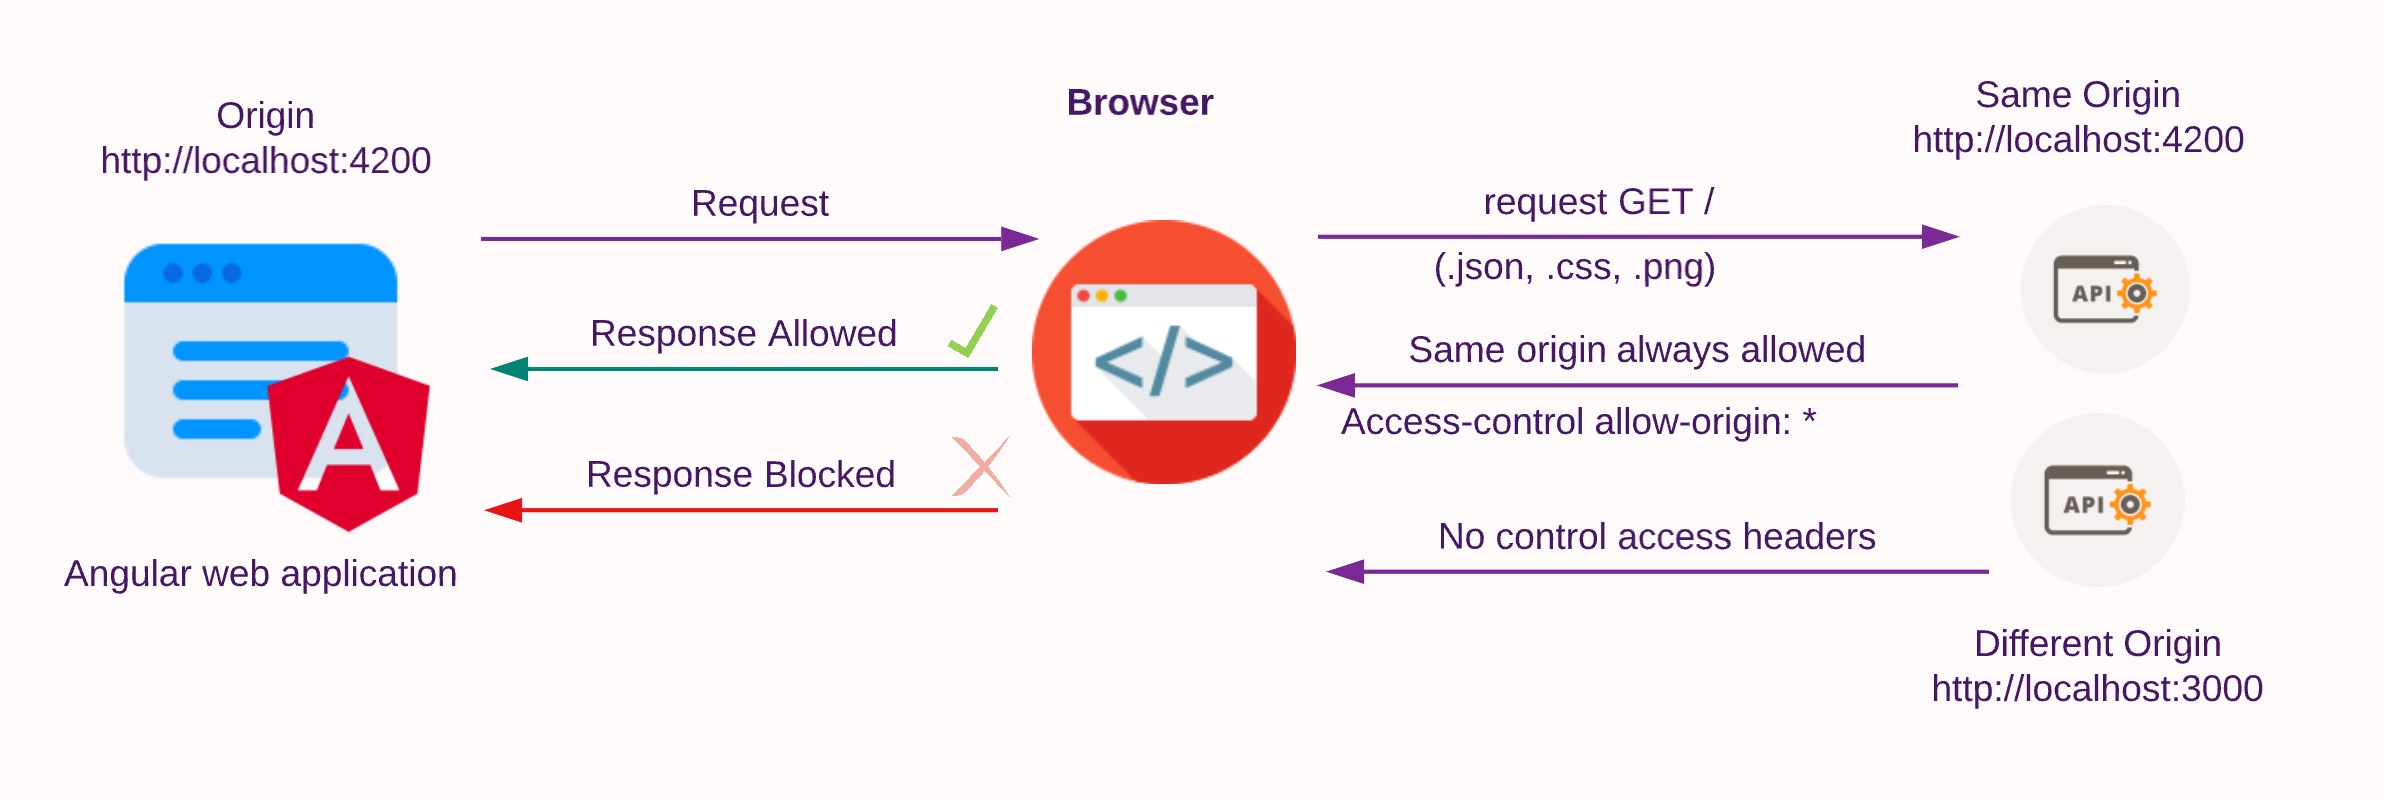
Access-Control-Allow-Origin (ACAO) policy header
The ACAO header is included in the response payload from one website to a request originating from another website and identifies the permitted origin of the request. A web browser compares the ACAO with the requesting website’s origin and permits access to the response if they match.
CORS issues
CORS issues occur when services running in different origins have to pass HTTP messages. In this context, the URL being accessed differs from the location that the frontend JavaScript application is running from, and this can happen due to servers having:
- a different scheme (HTTP or HTTPS)
- a different domain
- a different port
A familiar issue if you are requesting HTTP payloads in a frontend app will be the CORS error which can be seen on a browser’s debug console log as:
Access to XMLHttpRequest at http://localhost:3000/ from origin http://localhost:4200 has been blocked by CORS policy: No Access-Control-Allow-Origin header is present on the requested resource.

Here the remote server at http://localhost:3000/ (scheme://domain:port/ format) has blocked a GET request citing the CORS policy issue: No Access-Control-Allow-Origin header from port 4200 where although they have the same scheme and domain, the ports differ.
To overcome the issue, let’s look at enabling CORS in an Angular application where the application must talk to a node-based backend server and fetch data over HTTP. We will do this with a new project, the NinWiki!
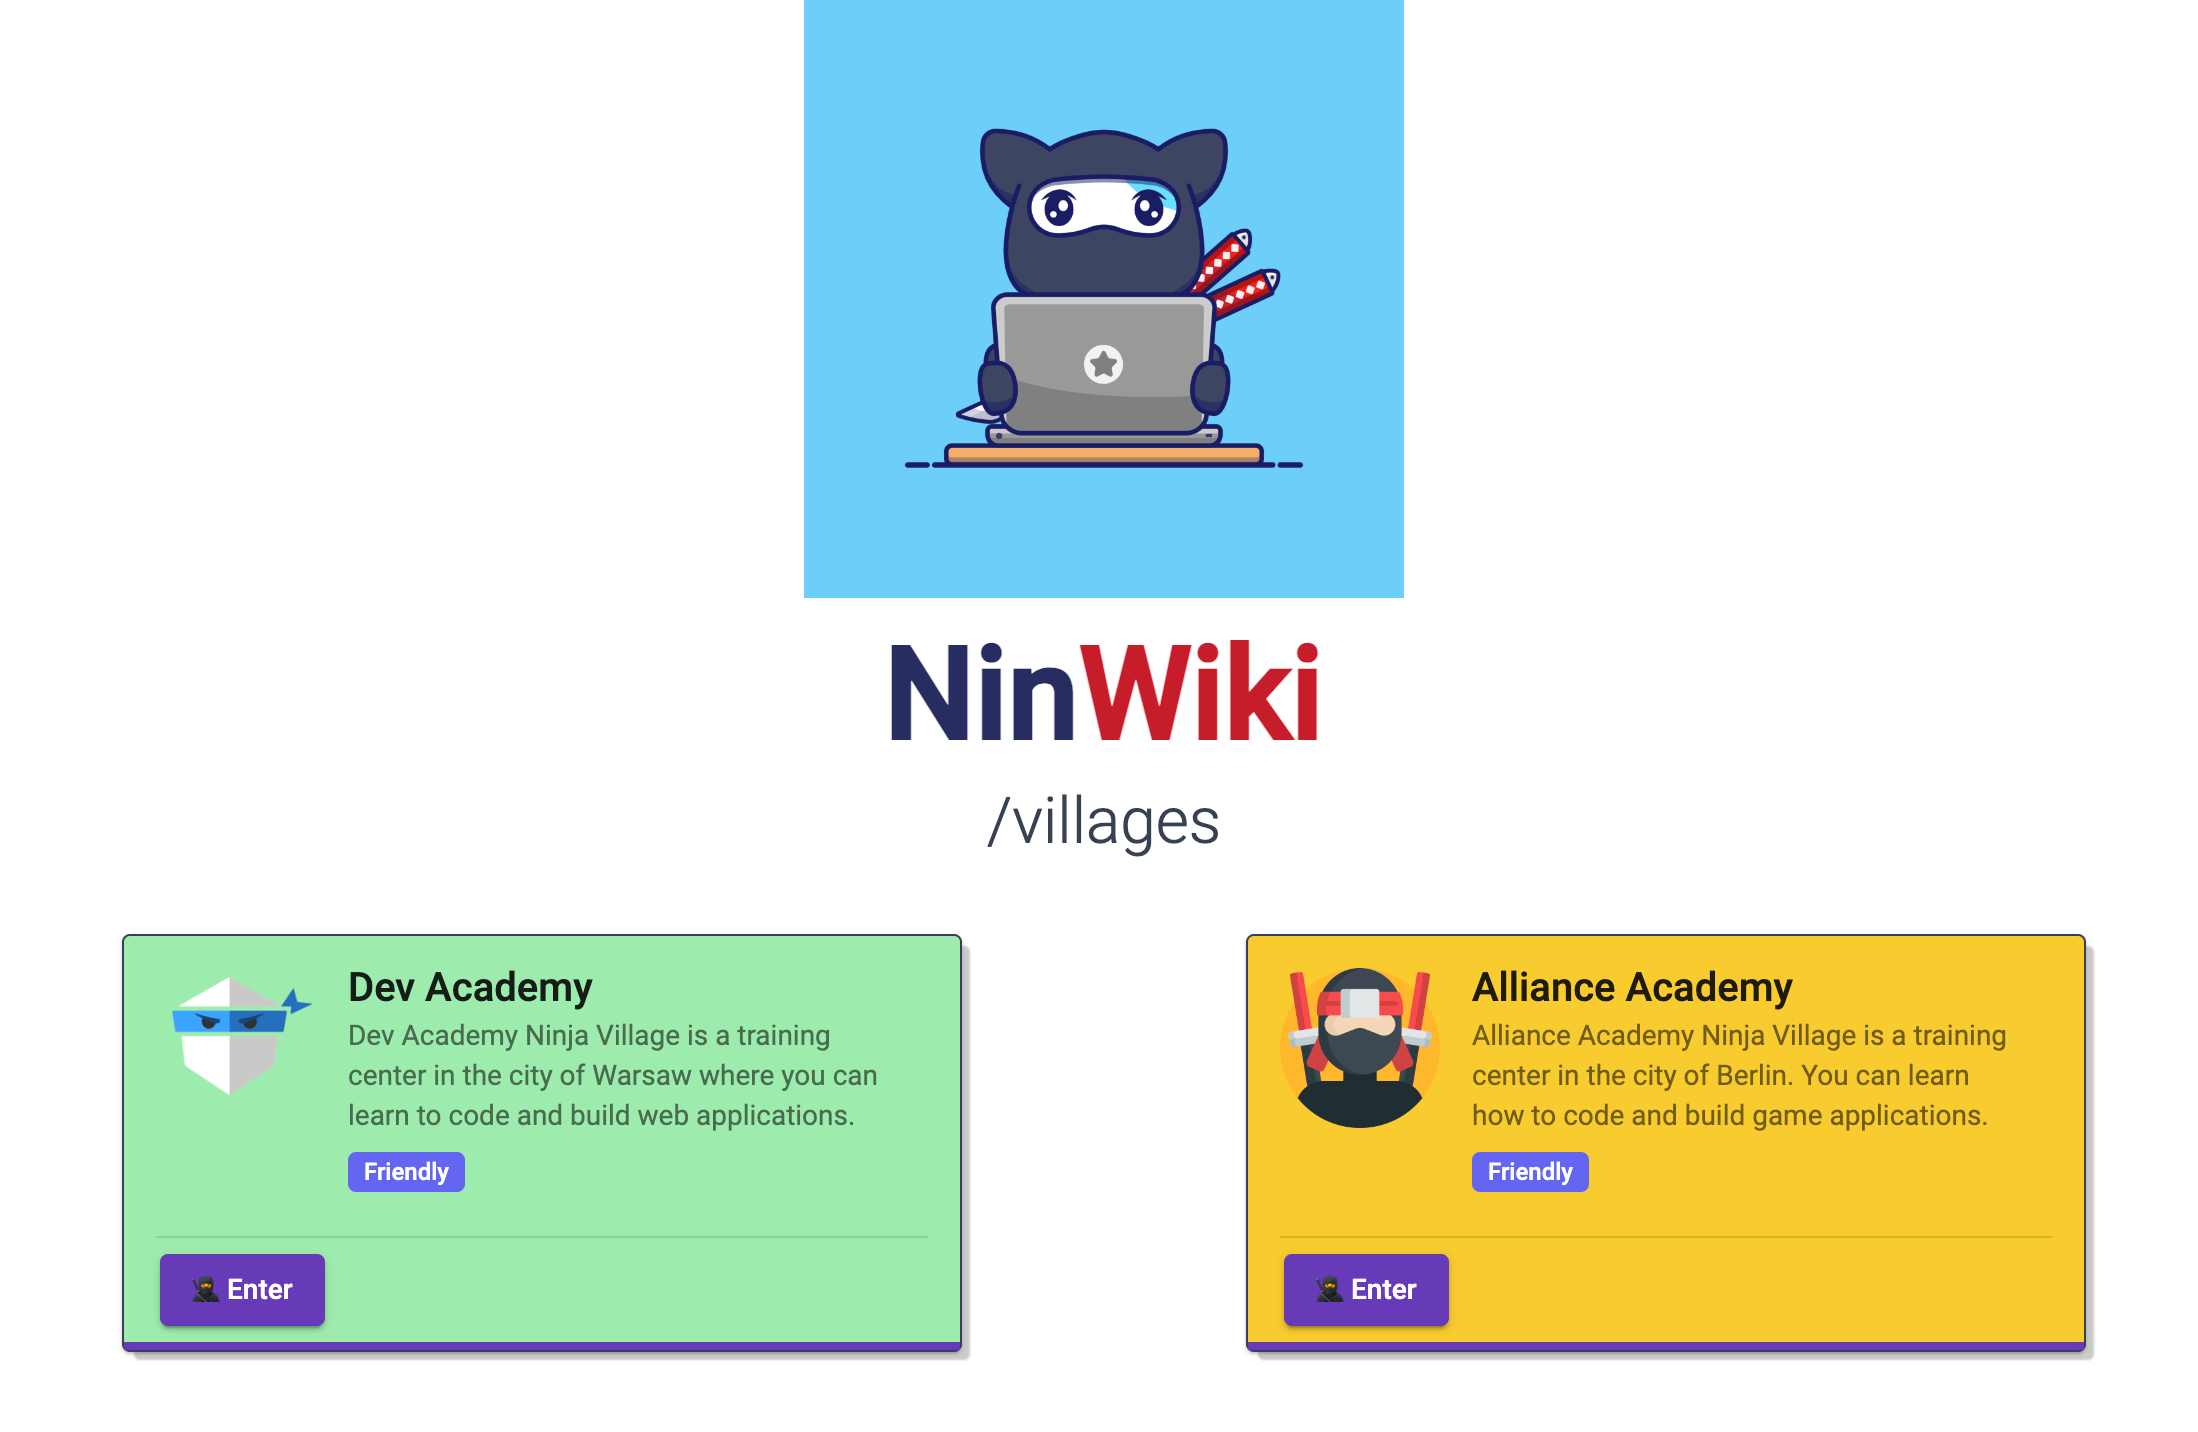
Introducing NinWiki
The NinWiki (Ninja Wiki) application helps Dev Ninja villages maintain intelligence networks. As you can imagine, villages have to provide intelligence to each other for their continued safety. The wiki is data-driven and numerous villages with their own servers have to communicate with each other continually via RESTful APIs. The application has many of the features that you’d expect to find in a modern API-driven application and will serve as an introduction to the fundamentals of Angular application in fetching data from a different origin.
The article will allow you to tackle CORS issues on your own, by showing how to:
- Setup CORS in your Angular application to fetch remote data successfully
- How to setup backend to allow for remote requests

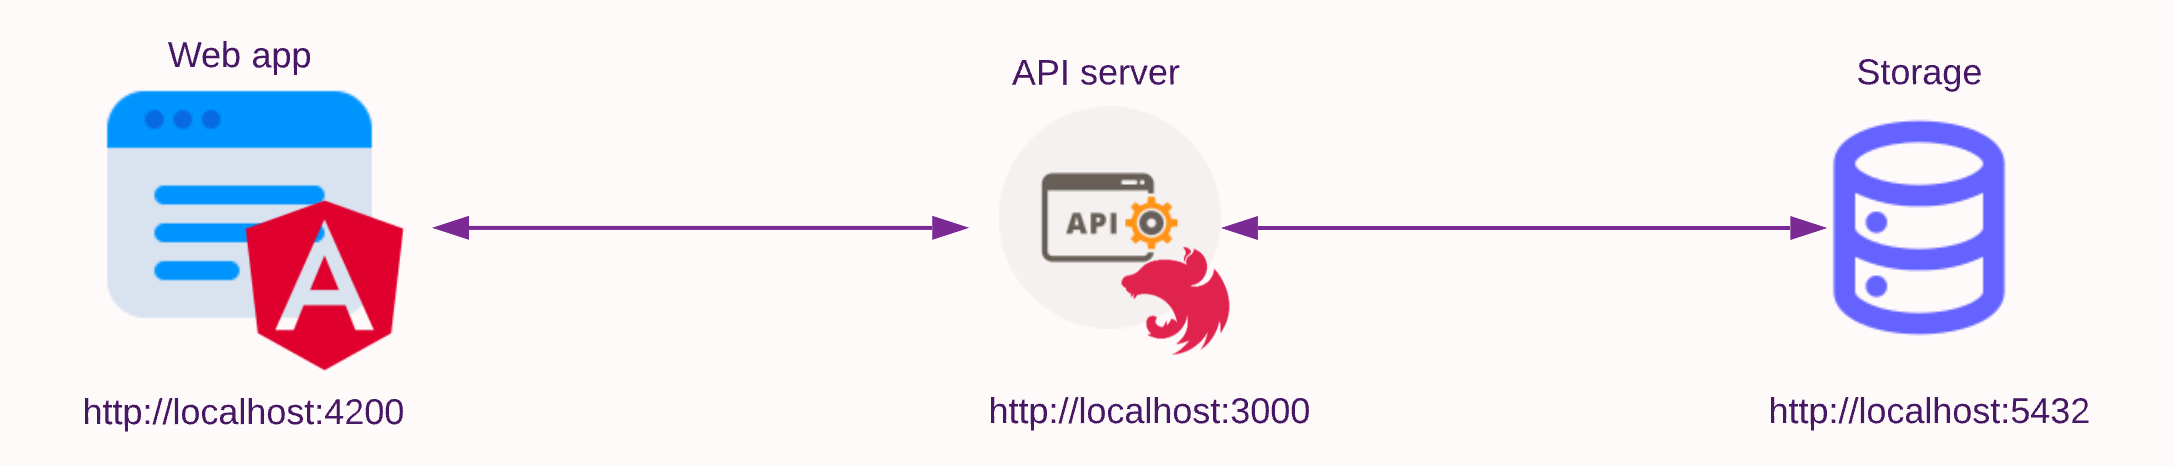
Project Structure
Front-end
The NinWiki, an Angular 14 frontend application is responsible for displaying various data gathered from backend servers.
Backend server and database
We will use Nest.js, a progressive backend framework heavily inspired by Angular itself, for the demo. Nestjs by default uses Express.js (built on top of Node.js) library under the hood. Hence, every technique for using the MVC (Model-View-Controller) pattern in Express applies to Nest as well. It is also changeable to other frameworks like Fastify. We can use them to look at various CORS configurations in the backend. The backend uses Postgres SQL as the database.
Docker
The application provided here has been dockerized and can be run on a local machine or the cloud. The backend exposes three application processes, the angular a nodejs-based backend server (port 3000), and a Postgres SQL database (port 5432) for persistence. Getting started and how to seed the data are provided in the repository README.md file.
HTTP requests with Angular, requesting villages
Using Angular’s client HTTP API for applications, the HttpClient service class in @angular/common/http package allows the frontend to request data from the backend API.
Let us call the HTTP method getVillages in our API service. The method uses the HttpClient.get() method to GET an observable of villages from the backend host server.

To know more on the RxJs operators for HTTP requests view the article by Dev Academy at https://dev-academy.com/rxjs-switchmap-concatmap-mergemap-exhaustmap/
However, when you run ng serve --open and view the frontend application’s home page on http://localhost:4200, the request is unable to fetch the list of the villages. On the Dev debug console you can see the Cross-Origin Request Blocked (CORB) error which blocked the request.
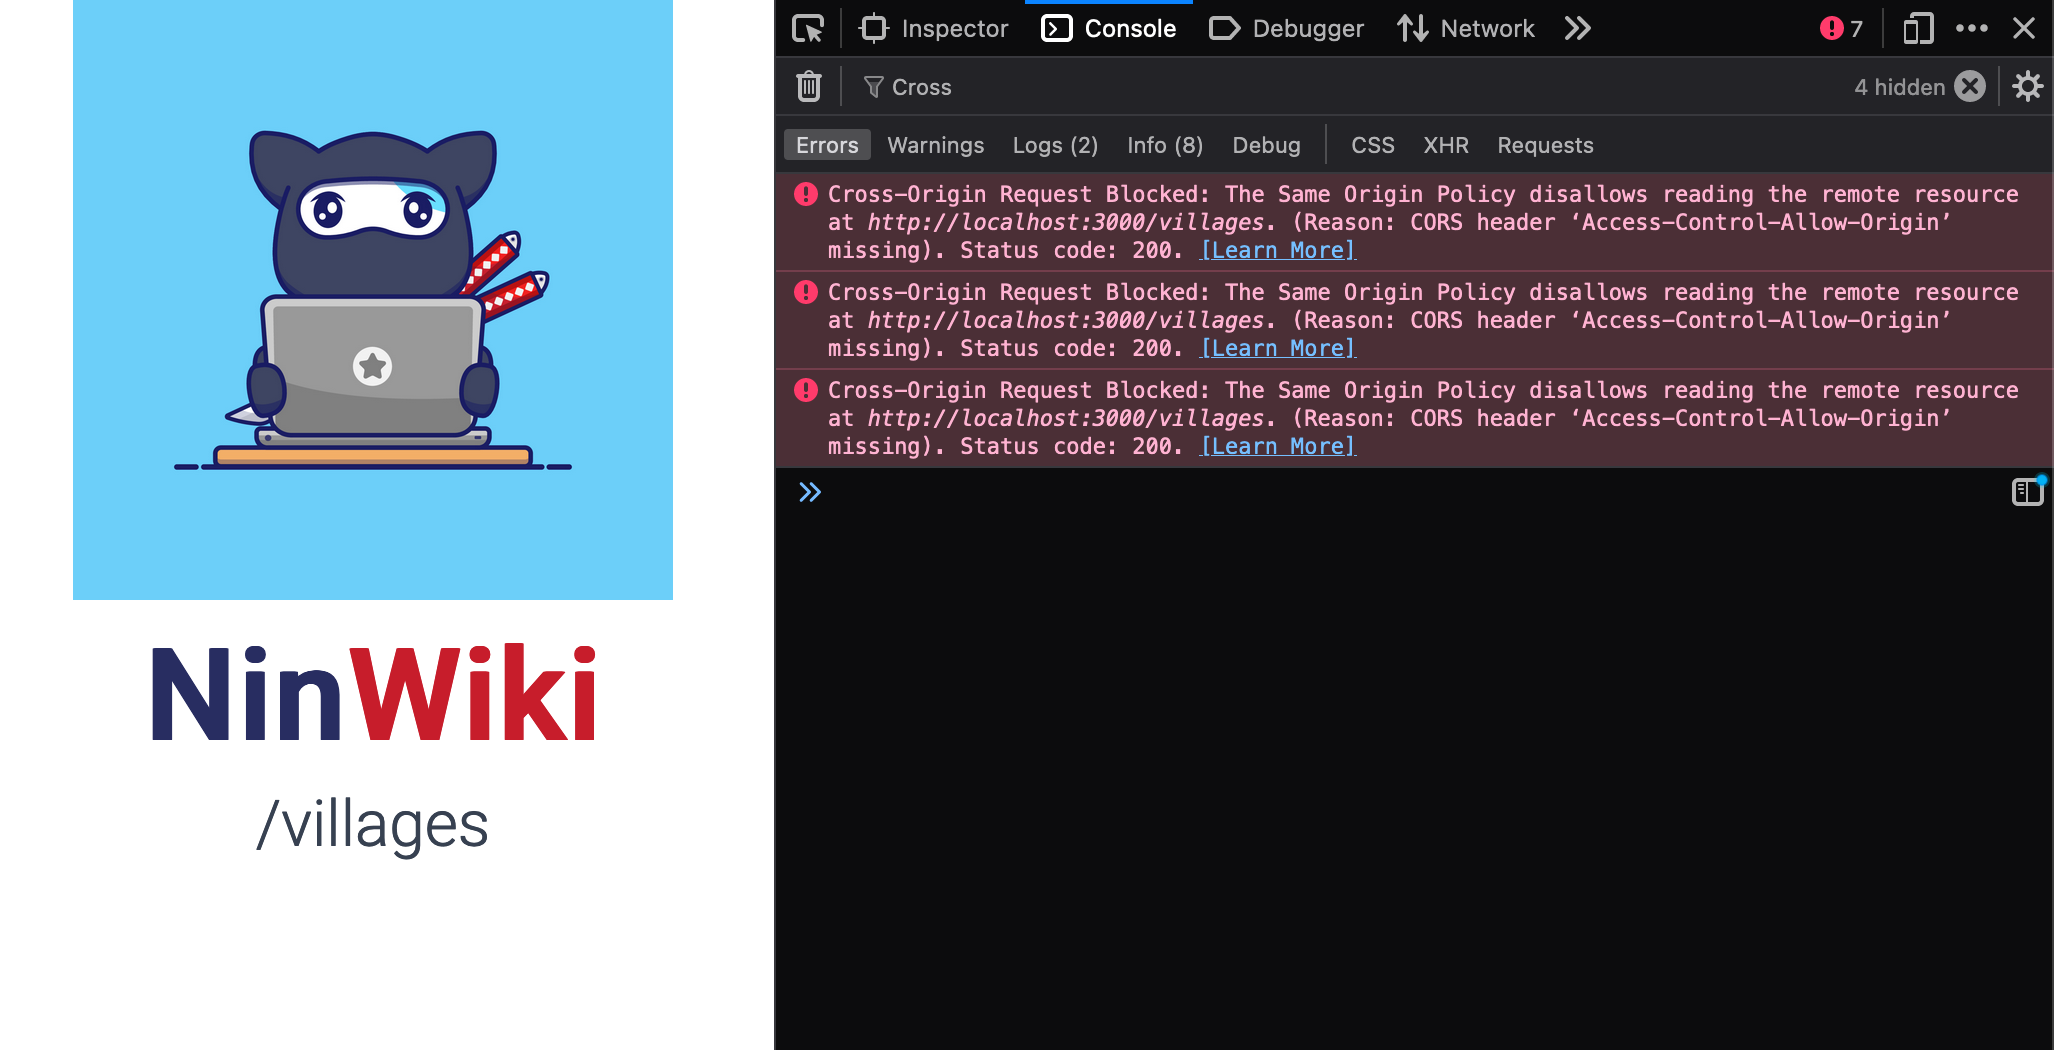
So, what happened here?
This is an error response for missing the required ACAO header, which is used to determine whether the resource can be accessed by content operating within the current origin.
Visiting the Network > Headers tab we see that the Response Headers do not contain the ACAO headers.
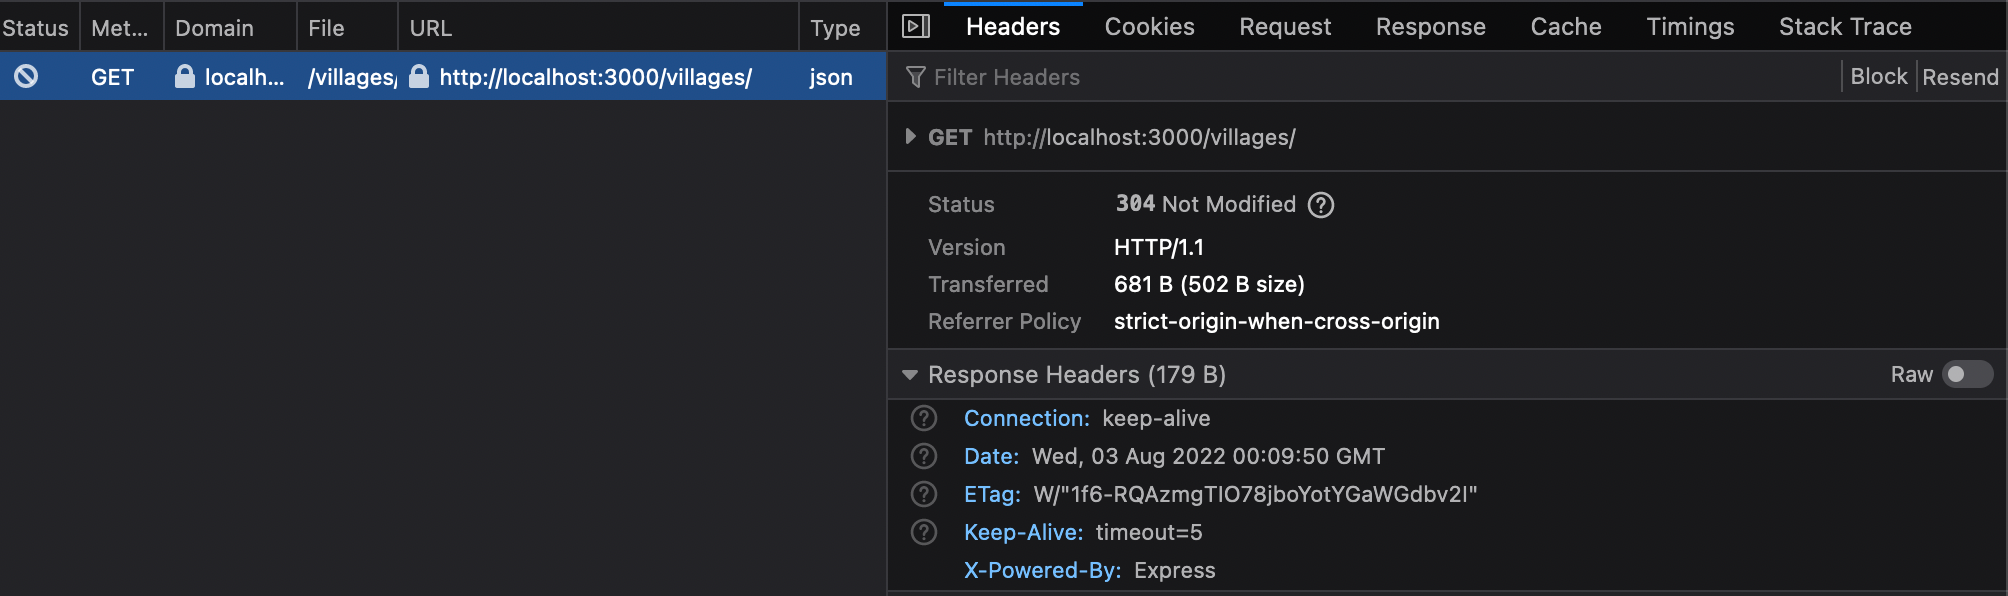
The response results are then blocked from being accessed by the browser if such a request fails, this can be seen in the response tab. The results can be empty but some browsers can also show results but still block the app from accessing them.

Let’s fix this error and get the wiki data!
Enabling Angular CORS via Proxy
To fix the cors issue and get the endpoint data, Angular provides its very own proxy bridge mechanism. A proxy is able to fake our server API backend origin (http://localhost:3000) as being the same origin (http://localhost:4200) as the app, whereas underneath the hood it’s accessing the resource from another origin.
Angular uses the underlying webpack bundler’s dev-server ability which in turn uses the http-proxy-middleware. The proxy when configured removes the restriction from accessing the source from a different origin. Let us have a look at how to configure a proxy.
Proxy configuration
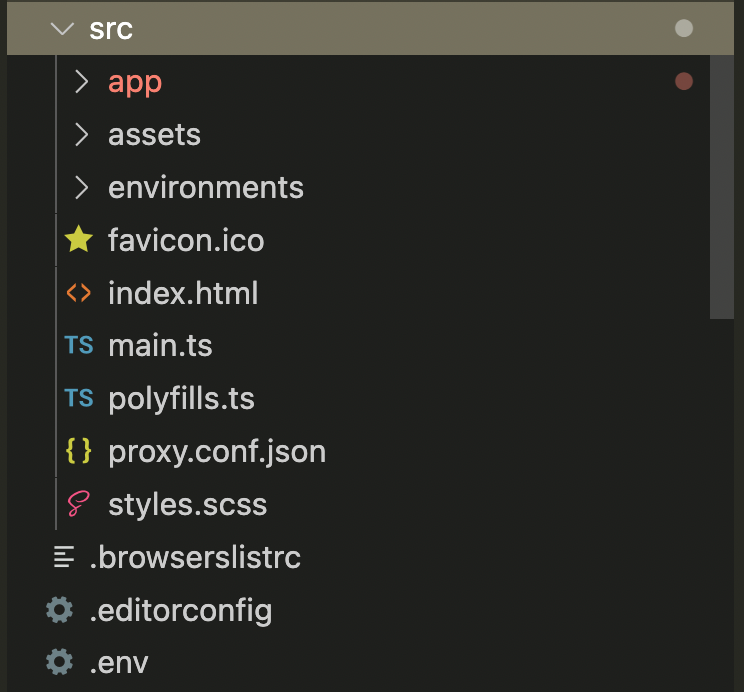
Enabling CORS requires you to provide a proxy configuration file. We have created a src/proxy.conf.json file inside the Angular src/ folder.
If you open the file you will see the following JSON config inside.
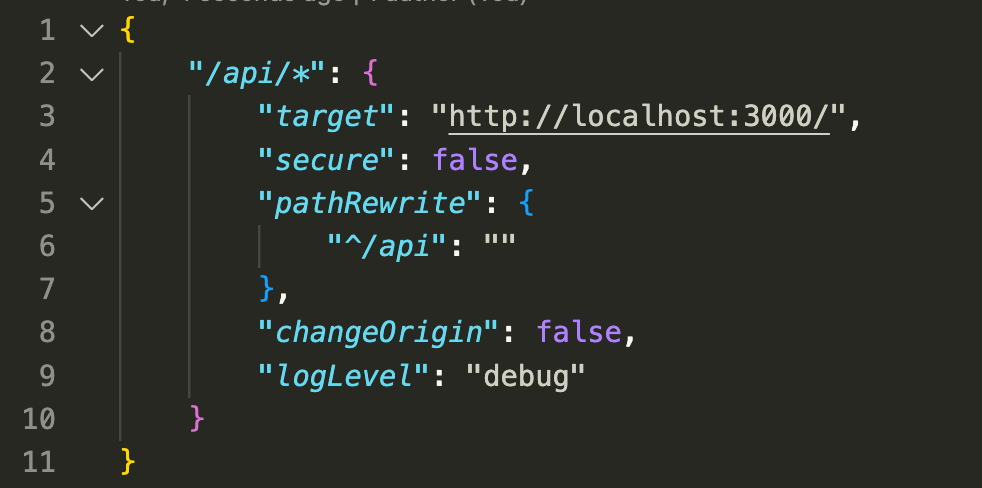
/api/\*key here is the server host route for the proxy and the nested object specifies the configuration.targetkey specifies the API url we are trying to reach, for example, the server athttp://localhost:3000, you can use any origin domain here (http://www.example.com).secureis set to false since we are serving the backend api over nonsecure HTTP.pathRewriteproperty rewrites the request prefix path. Here /api prefix of the request is removed so when callinghttp://localhost:4200/apinow convert tohttp://localhost:3000. This allows clear separation in requests and not collide with our own application routes.changeOriginproperty specifies that the target is on another domain different from that which the app is currently running on.logLevelkey is set to debug, the webpack then log errors in your application’s terminal.
Passing Proxy configuration to Angular
We can use two different methods to register the angular cli proxy:
Passing the file to the –proxy-config flag
ng serve --proxy-config src/proxy.conf.jsonin the angular cli. This selects and uses the configuration file, you can have several configs.
Modify the angular.json file and add the proxyConfig key file to the architect > serve object’s options. This sets src/proxy.conf.json file as proxy config source for the Angular app.

You can also set up the config for each environment:

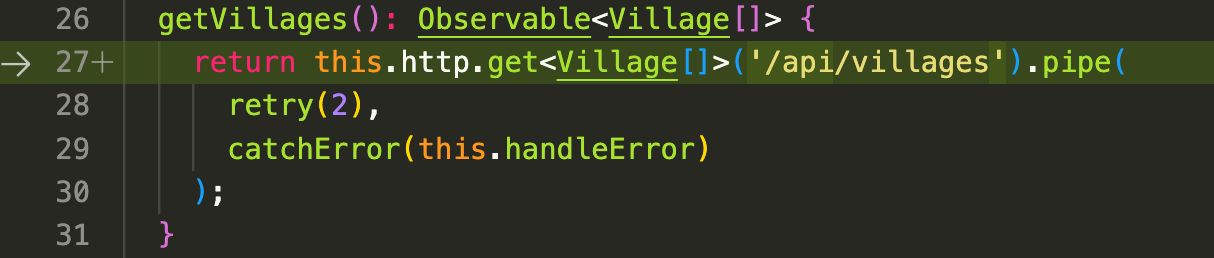
We should now update our API.service.ts file, the function no longer requires the API host URL instead we will use the name that we set for the server in proxy file(/api) and call endpoints on it. Let us set the request to /api/villages which internally redirects and fetches data from localhost:3000/villages due to proxy.
Please make sure to restart the application on updating the proxy configuration file to have the changes take effect.
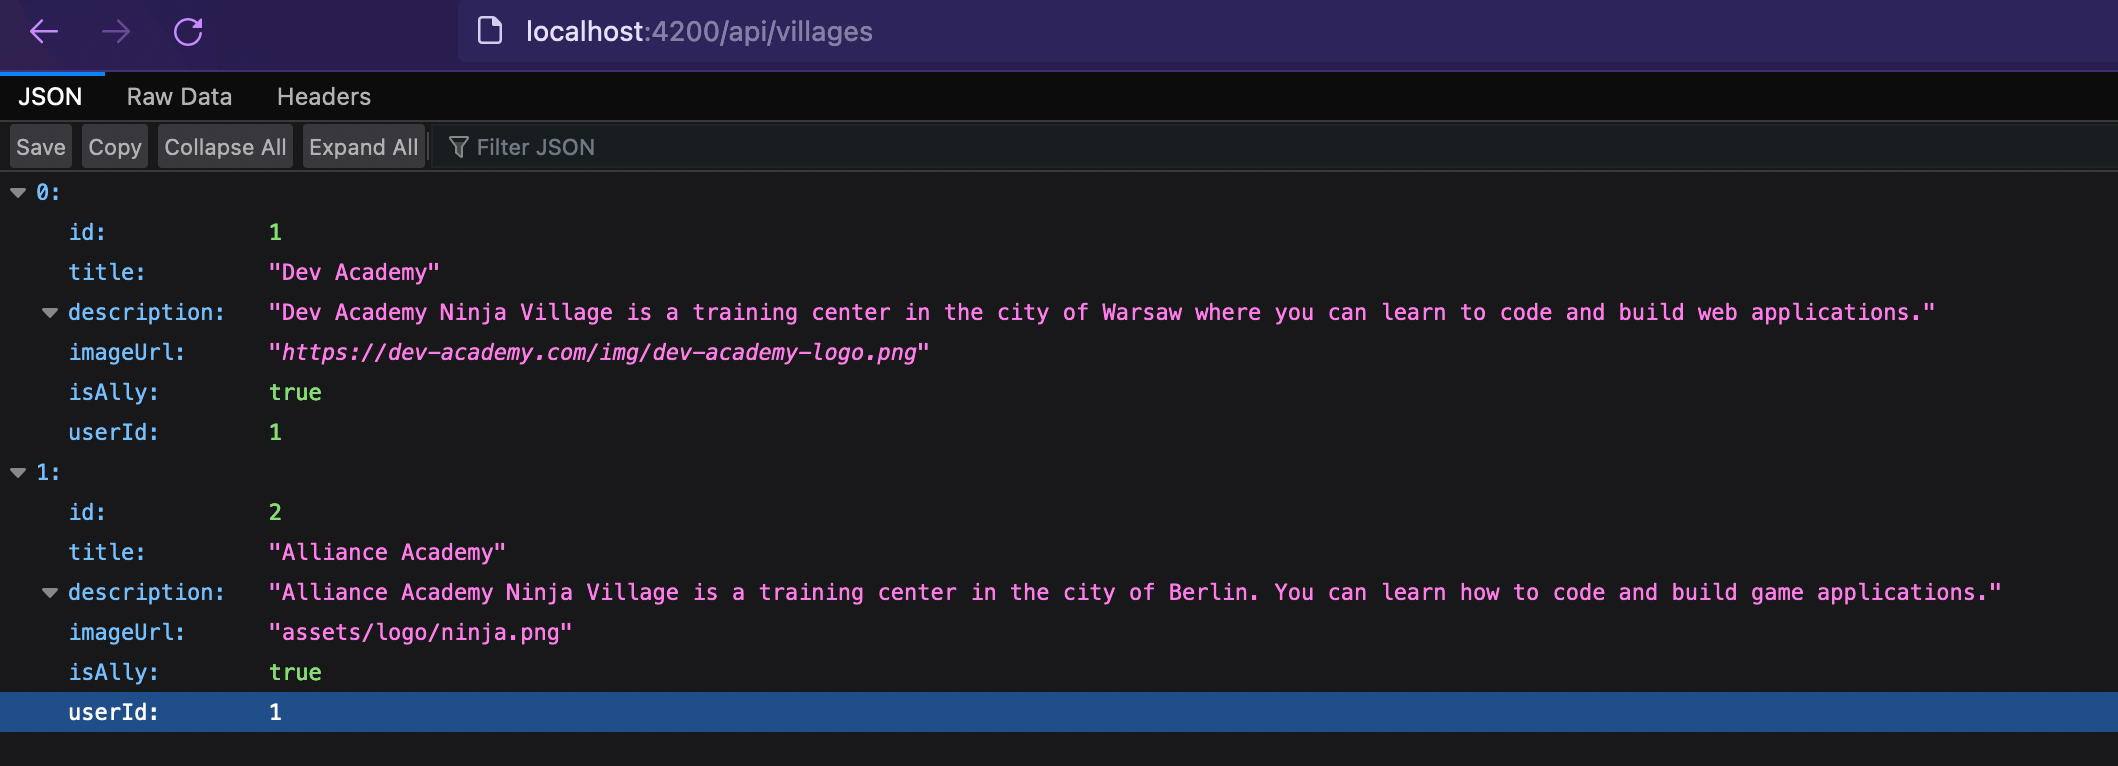
The angular application now pretends to host the API within its own origin port and can redirect requests to the backend. If we visit the http://localhost:4200/api/villages page, we see the same results as visiting http://localhost:3000! Remember that the proxy rewrites the path and removes the /api.
Note there are other ways (a .js or .ts config file) for proxy configuration and more options to go for a different domain or federation scenarios. Visit the official Angular proxy chapter for more.
Running the application
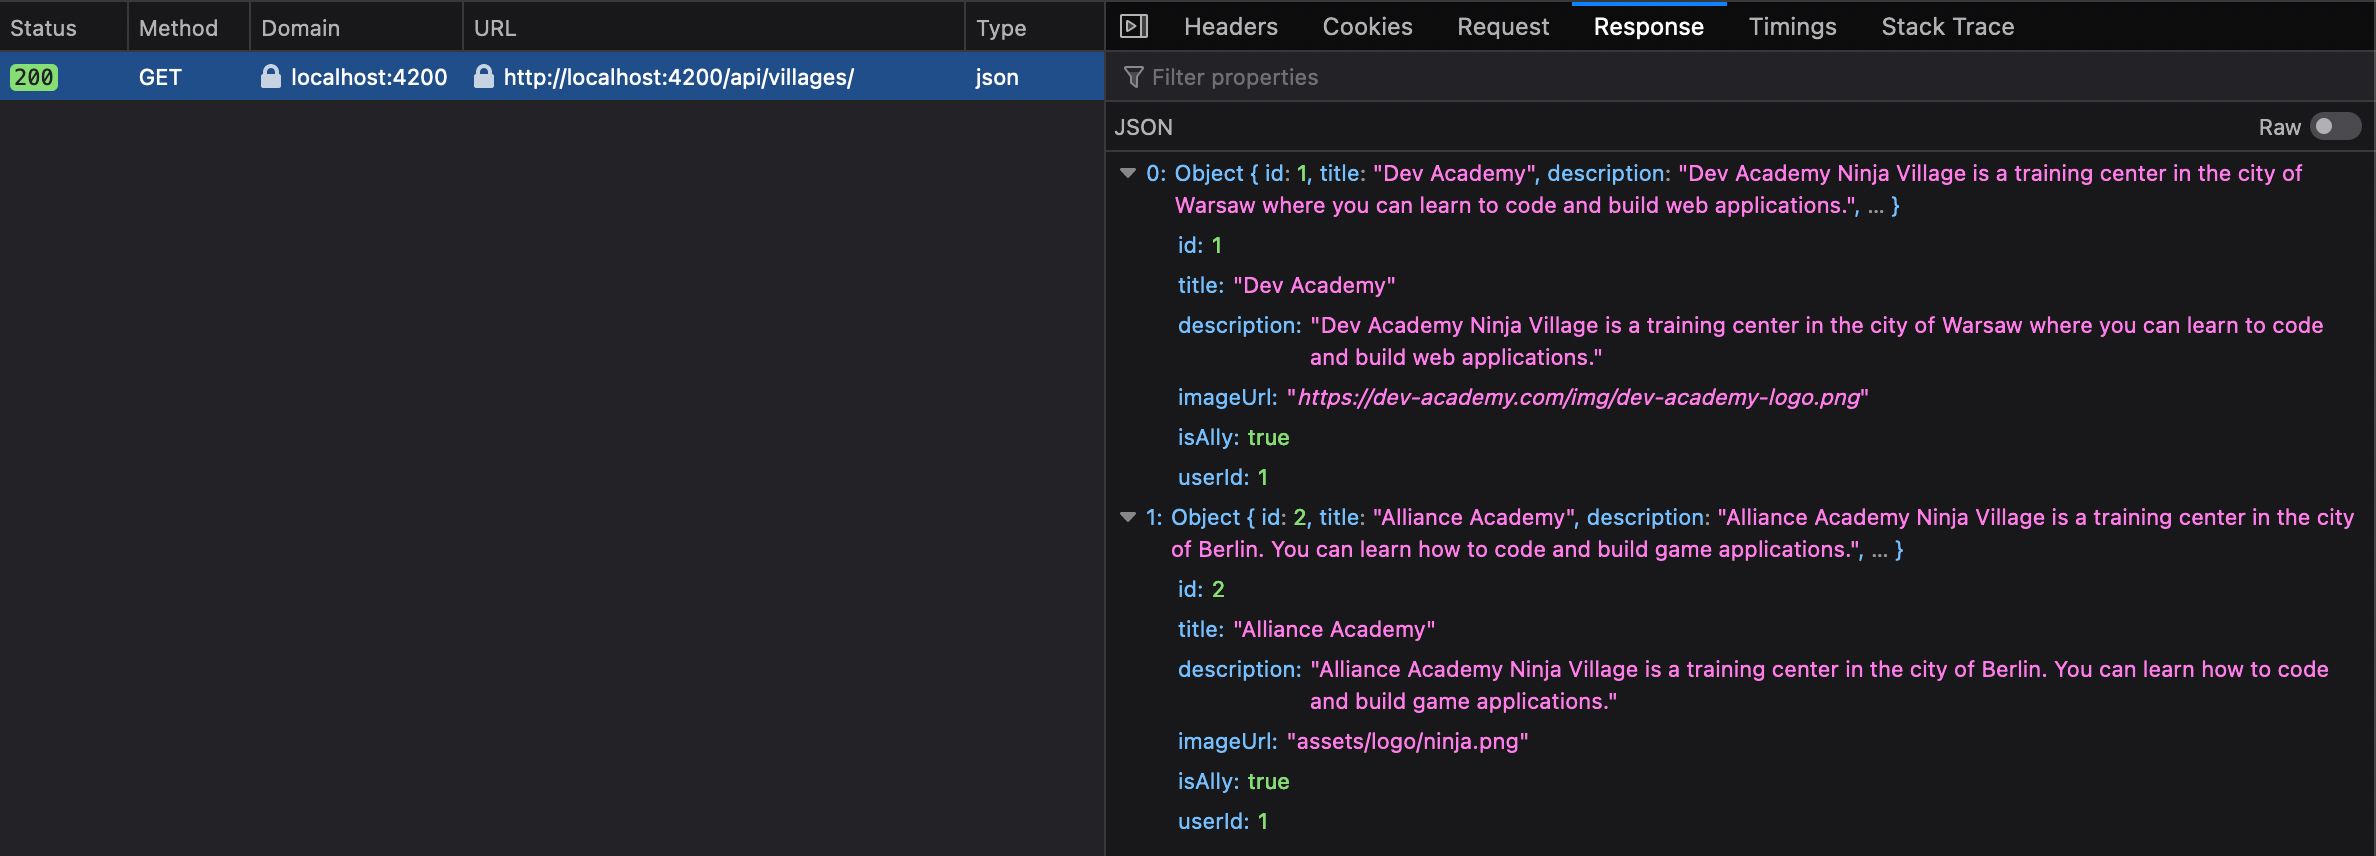
Now if we run ng serve --open and visit we can see that the request was completed successfully!

We can now inspect the dev console to see that ACAO allows all header is present.

and that the Response data wasn’t blocked:
The home page displays villages successfully!

Proxy is good for development purposes but if you want to set the application for production than you will need to configure the backend itself. Let us see how we can do that without proxy.
Enable CORS in Nest.Js (Node/Express) Server
CORS in a production environment is a server-side configuration. Usually, the webserver and the frameworks provide mechanisms to allow for resource sharing policies set up.
Simple Usage (Enable All CORS Requests)
In Nest.js this can be simply done by passing the cors: true property, to app bootstrap in the main.ts file.

This sets the ACAO header to the wildcard (*), please note that allowing any application to request data from the server and can be a security issue.
We can now set the service request back to the server origin:
If you check it with the frontend application, you will see the request was fetched properly.
In the cli you can fire a HTTP request (here we are using the HTTPie library) to view the access-control-allow-origin header, which will be set to wildcard (*) allowing all origins.

This was a basic configuration but cors can be configured in many ways for different application requirements. CORS headers should be properly defined in respect of trusted origins for private and public servers. Let us have a look at more advanced cors options now.
Advanced CORS options
Advanced settings help configure the server properly as vulnerabilities arise primarily as misconfigurations. Nest.js provides atomic methods to allow for more advanced CORS configurations. In the main.ts file use the explicit method enableCors(), below is an example of the defaults for a wildcard origin:
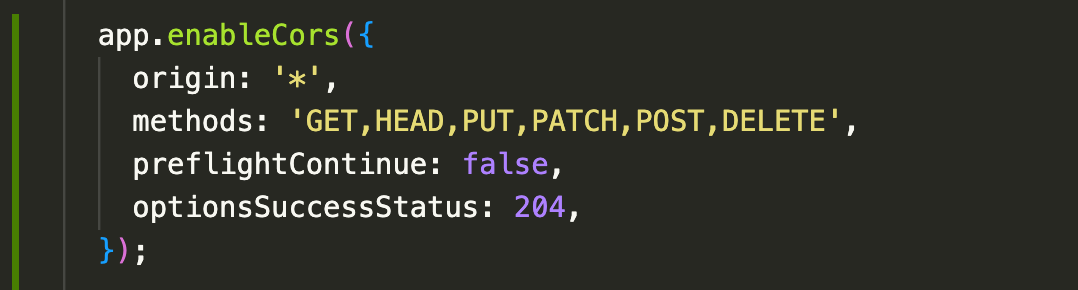
The method is Express.js based under the hood and thus one can refer to https://github.com/expressjs/cors#configuration-options for all options here. You do not require the key cors: true used in previous main.ts config.
Several ACAO header directive types exist and thus the origin should be properly specified to protect web app sensitive information.

\*: Use this to allow any origin and without any credentials. This will throw an error if we try to access it with credentials. Avoid using wildcards in internal networks, trusting network configuration alone to protect internal resources is not sufficient when internal browsers can access untrusted external domains.<origin>: Specify a single domain that is allowed access, only allow trusted sites.null: Typically used in a sandbox where the request is coming from a file on a user’s computer rather than from a hosted web page. It is advised to avoid using this header directive due to security concerns.
Setting the origin to a custom domain (which can be set as a list as well), modifies the ACAO header.


Static contents
This cross-origin sharing standard can enable cross-origin HTTP requests for various content types like images, web fonts, and CSS Shapes from images.
Serving static content will be beyond the scope of this article.
Pre-flight requests
Pre-flight requests are for requests that are complex, request such as DELETE, PUT or PATCH needs to ask for the server’s extra permissions with OPTIONS headers before making the actual request. For example, if we try to send a DELETE method to /villages/1 resource you will see two requests made, the OPTIONS header is first checked if the Access-Control-Allow-Methods allows the said method.
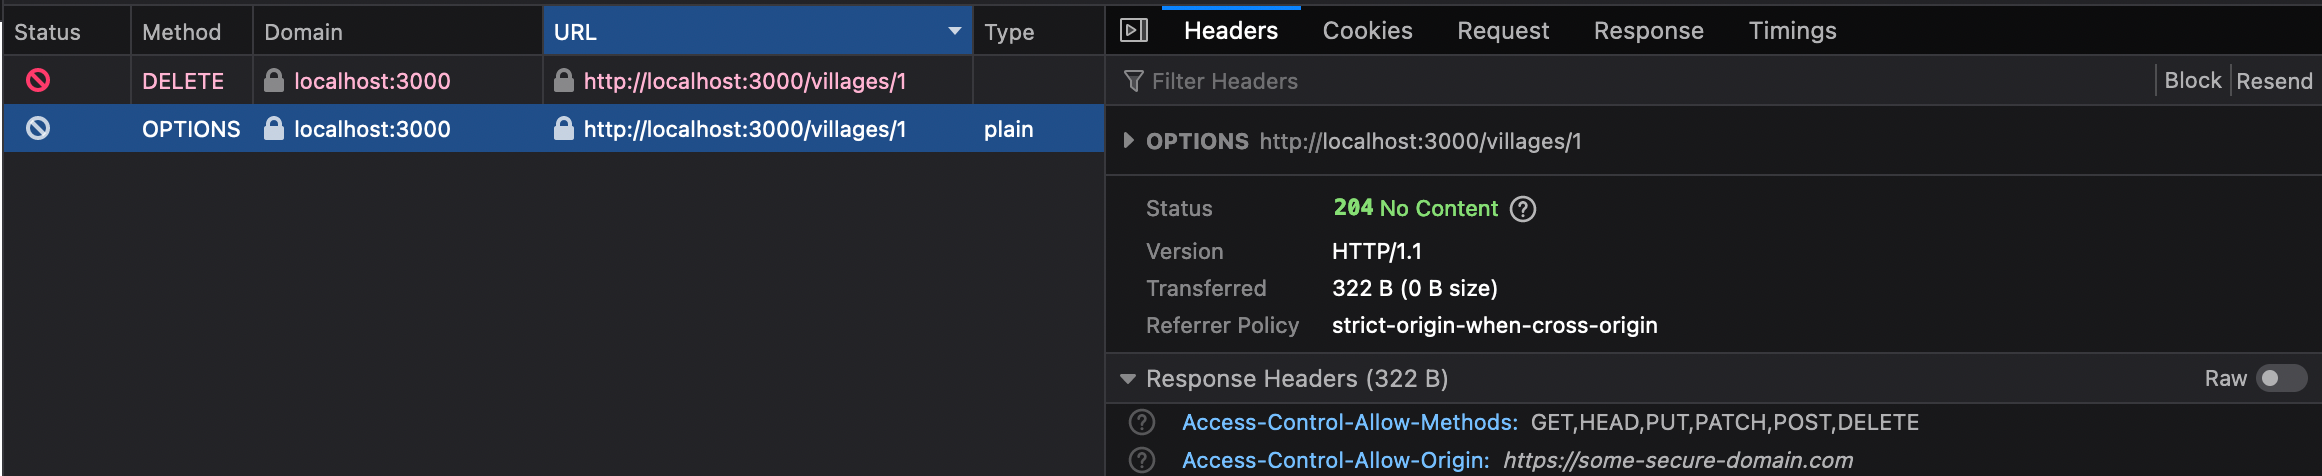
The preflight protects CORS-enabled servers from receiving cross-origin requests they may not want. The OPTIONS are exchanged before the Request and payload itself. This exchange of the metadata adds to the overhead which can be overcome with caching.
Production environment
CORS is browser-side only and is not a substitute for server-side security policies and is not a replacement for server-side protection of sensitive data. Poorly configured CORS may cause more security issues as it relaxes the Same-origin policy instead, and thus is susceptible to CSRF attacks or TLS hacks. Authentication mechanisms and session management thus should still be applied for further protection.
We can use proxies like Nginx or load balancers like (AWS Coludfront) as alternatives, and provide an extra layer of configuration but this is beyond the scope of this article.
You now have more idea on how Angular handles cross-origin resource sharing and how to fix your cors issue via the angular CLI and your API backend. Hope you got the CORS confidence boost for the shiny web application you develop! Until next time.
If you are interested in learning more about building secure Web applications consider joining our flagship program Web Security Academy. It will teach you everything you need to know in that area. ⭐ Some of the actionable tips are also covered in our secure coding training article.


Comments