

Angular as a framework provides us with a significant number of tools and capabilities out of the box. Today I will be writing about one of these beneficial features called HTTP Interceptors.
I will briefly describe what Angular HTTP Interceptors are and how they work. I will then provide some common usages with implementation examples and discuss some advantages of using interceptors on your app. This article assumes that the reader already has some Angular experience and is comfortable around the most common and basic notions. These will not be explained in detail since they are not in the scope of this document.
Table of Contents
What is an Angular interceptor, after all?
Although the name might sound like something extraordinarily fancy and complicated, Angular interceptors are merely a special kind of HTTP client service that has the sole purpose of intercepting every HTTP request performed. This is true for both incoming and outgoing HTTP requests. OK, I’ve seen this quick definition in several places, but what does that exactly mean? How does it work?
We all know a picture is worth a thousand words so let’s try and create a simple diagram that will explain what intercepting a request means:
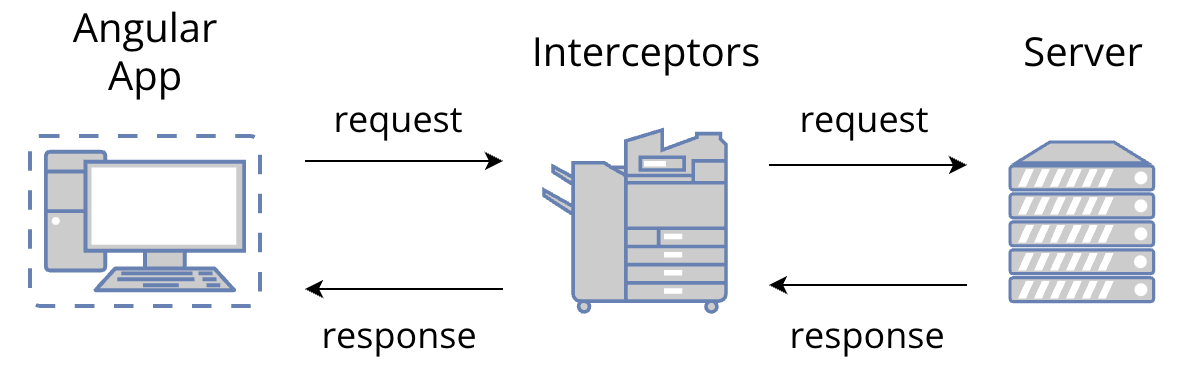
A typical workflow of an Angular app, at any point in time, will perform a series of HTTP requests to a server to perform everyday tasks. These are authentication, data loading, etc. We will come back to this in a moment.
The diagram above shows that the HTTP interceptors will always be in the middle of any single HTTP request. These services will intercept all requests performed by the app, allowing us to perform many operations on them before they are sent to the server. Functions include adding a custom HTTP header to the final outgoing request (e.g. adding an authorization header and passing an authorization token on all endpoints requiring a set of permissions, etc.), caching, logging to collect metrics, error handling, etc.
A similar process happens when the server replies. We now have the response being intercepted by the HTTP interceptor, allowing us to perform a series of operations before the app consumes the final answer. An everyday use case scenario could be transforming the response object into a format more meaningful to the product. For example, cleaning up the response object and extracting only the required parts instead of dealing with that on every component that would use the data.
OK, I guess by now, it’s clear what an HTTP interceptor is, where it sits on an everyday Angular app workflow, and its purpose. But how does this work? Don’t we risk having multiple requests modified all over the place and causing a chaotic set of events going back and forth?
How does interceptor work?
Setting up a piece of logic that can transform HTTP requests in a centralized place sounds like a great feature. This way, we don’t have to create several layers of duplication whenever we want to perform a request or consume a response. Without interceptors, we would need to implement the same logic repeatedly for each HTTP request being performed by hand!
Although for all this to be possible, there’s a critical piece of knowledge that needs to be present at all times. From the Angular documentation:
Although interceptors can modify requests and responses, the HttpRequest and HttpResponse instance properties are readonly, rendering them largely immutable. They are immutable for a good reason: an app might retry a request several times before it succeeds, which means that the interceptor chain can re-process the same request multiple times. If an interceptor could modify the original request object, the re-tried operation would start from the modified request rather than the original. Immutability ensures that interceptors see the same request for each try.
This information is vital to understand that we will always need to create a new request copy with the intended changes to ensure a deterministic workflow. This will be helpful to understand why the implementation always needs to call the clone method and then transform the request before passing it through.
Can we have multiple interceptors?
Yes! An app can have multiple interceptors, each dealing with its scope of action. For example, we can have an interceptor dedicated to coping with auth, one dealing with error handling, a third dealing with logging, etc. This is only possible because Angular has an intelligent way of processing the requests. According to the Angular documentation:
Angular applies interceptors in the order that you provide them. For example, consider a situation in which you want to handle the authentication of your HTTP requests and log them before sending them to a server. To accomplish this task, you could provide an AuthInterceptor service and then a LoggingInterceptor service. Outgoing requests would flow from the AuthInterceptor to the LoggingInterceptor. Responses from these requests would flow in the other direction, from LoggingInterceptor back to AuthInterceptor.
The following diagram could represent the use case described:
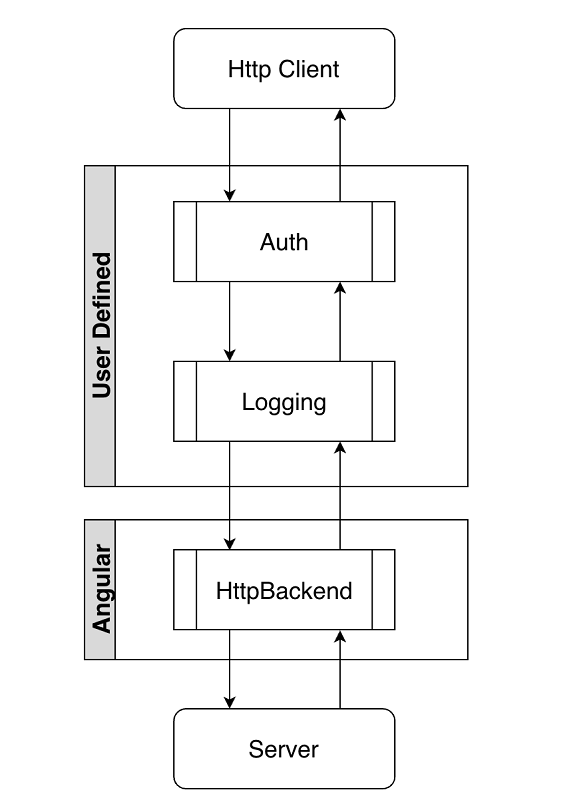
Although only the user configured the auth and logging interceptors, Angular has another interceptor for default handling all back-end server calls. This interceptor is called HTTP backend and is always the last on the execution chain, independently of how many other interceptors are created and configured by the user.
It’s crucial to understand that once the order of execution of this chain is established, it cannot be changed. You also cannot remove or disable an interceptor on the fly. From the Angular documentation:
You cannot change the order or remove interceptors later. If you need to enable and disable an interceptor dynamically, you’ll have to build that capability into the interceptor itself.
Why is it so essential to understand this? Because they will consistently execute the request in the same order, they were configured. This could make a big difference when thinking about what order should be used to avoid surprises when expecting a detailed response and receiving a different one because the interceptor that executed it before in the chain already transformed it.
How to implement it?
Now that we have a basic idea of an interceptor and its primary purpose, it’s time to talk about implementation. How to implement an Angular HTTP interceptor? I will be showing a few examples of the most common use cases, such as adding custom HTTP headers, caching, logging, and error handling.
Initial Setup
Since the scope of this document is around HTTP interceptors, I am assuming the reader would have a previously created Angular project.
Now create a new interceptor using Angular CLI and briefly discuss it on your existing project. As mentioned before, an interceptor is nothing more than an Angular service that implements a specific interface. Let’s run the following command: ng generate interceptor example.
This CLI command will create an interceptor called ExampleInterceptor with the following code:
1 | import { Injectable } from '@angular/core'; |
As we can see, an interceptor service implements the HttpInterceptor interface, imported from the Angular common module. We need to implement the intercept method with our customized code for each use case. This method receives an HTTP request performed by the app and the handler executing the chain of calls. If no custom transformations are in place, it will simply pass it through to the handle method (next.handle(request)) and repeat the same process on all the subsequent configured interceptors (as explained in the workflow diagram above).
Custom Header Interceptor
One of the most common use cases for interceptors is handling auth requests. This can be achieved easily by adding the required headers to the outgoing request inside the intercept method.
The examples provided are, of course, using mocked examples of security tokens. The main goal is to show the reader how to implement auth interceptors by adding custom headers to the requests. In this scenario, we will be adding an authorization token. The examples discussed below should be easily adaptable to a real-world application with a proper authentication system.
If you are interested in learning more about authorization and building secure Web applications consider joining our flagship online program Web Security Academy. It will teach you everything you need to know in that area. You can also check our write-up covering secure development training with actionable steps to build secure Web applications.

Basic Authentication
Consider a Basic Authentication scenario where we must authorize every request accessing the API. We could have an interceptor like the following:
1 | import { Injectable } from '@angular/core'; |
Basic Authentication Breakdown
Let’s now break down in steps what’s happening here:
For the sake of this example, we are assuming there is one authorization service responsible for maintaining and providing basic authentication tokens. We inject the service on the constructor to be available whenever needed in the service. The implementation of this service is not part of our goal, being out of the scope of this article.
1 | intercept(request: HttpRequest<any>, next: HttpHandler): Observable<HttpEvent<any>> { |
Our intercept method is relatively lean, having just one call to the function responsible for transforming the request by adding a new header.
1 | addAuthToken(request: HttpRequest<any>) { |
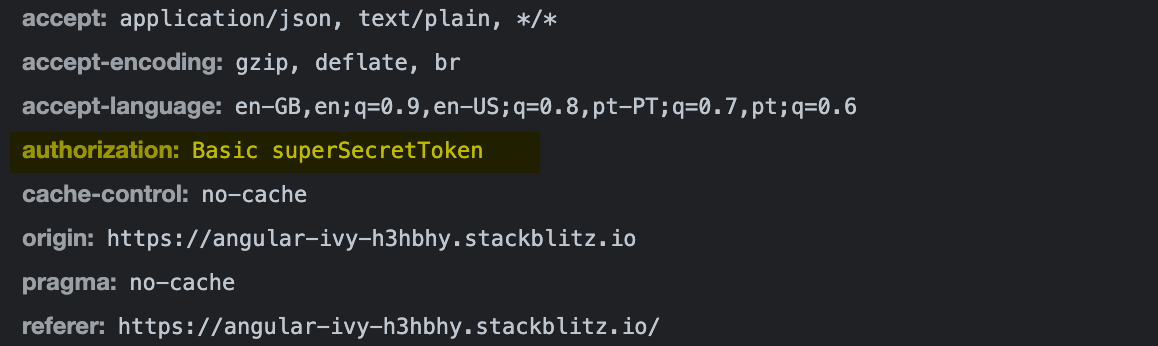
Finally, the addAuthToken method will ask for a new token and set the header ‘Authorization’ by defining it as ‘Basic’. One critical aspect for retaining in this small piece of logic is the call to the method request.clone(). As mentioned before, all requests are immutable, so this is the correct way of transforming an existing request by creating a new version with the intended modifications.
A fully working example can be checked here. When clicking on the button ‘Basic Authentication’, we can verify in the dev tools, in the network panel, that the authorization header was added with the ‘superSecretToken’ provided by the authorization service:
JWT Authentication
The previous example was simple enough to explain how to create a trivial request transformation inside the intercept function and create a new request with the new auth header.
Although apart from a small number of use cases, in the current days, ‘Basic Authentication’ is not a common scenario for most apps.
One common usage of the auth interceptor would be handling requests dealing with a JWT token. I will start by showing a typical implementation and then break it down into steps for more clarity.
Let’s consider a use case where we have an app with JWT authentication with refresh token support:
1 | import { |
JWT Authentication Breakdown
This example is considerably more complex than the basic authentication one, but let’s break it into small parts, and it will seem a lot less overwhelming.
1 | private refreshTokenInProgress = false; |
When working with JWT, it is standard to make usage of a refresh token. It’s one of the practices used. In our interceptor, we will be using a Boolean variable to store a temporary state. At the same time, a refresh token is being loaded and a Behaviour Subject to keep the state of the last change. We are, of course, initializing it to null since when loading the application, until the user authentication is completed successfully, a token will not be created.
1 | return next.handle(this.addAuthToken(request)).pipe( |
This call of the intercept method is a bit different than the one on the minor example. When a user tries to perform a request to an API or a view of an app to which it has not yet been authorized on a properly designed product, will receive an exception with the HTTP error code 401. Knowing this, the correct way to handle the workflow on the interceptor is to capture the exceptions and process the request according to the type of exception triggered.
1 | if (requestError && requestError.status === 401) { |
If the user tries to access an API without the expected authorization will get an exception with status code 401 (unauthorized). At this point, some additional checks need to be done to decide how to proceed with the request. If we already have a new refresh token being processed, the workflow will wait until the token is available and provided to the behavior subject. Once it is finally available, we add the token to the header and pass the transformed request through.
1 | else { |
When no refresh token has been requested yet, a new process starts. We start by flagging the application that a new refresh token request is now in place, and we ensure that no unexpected value is pending on the behavior subject by setting it to null. This will ensure the request will wait until a token is provided (as shown in the former example).
The only thing left to do is now request a new refresh token, emit it to the refresh token subject as soon as it’s available and then add the token to the request header.
Finally, we need to ensure we leave the process clean, so we reset the refresh token flag to false.
1 | else { |
For the scope of this example, if the error status code is not 401, we throw the error up to potentially be caught by a dedicated error interceptor.

Caching Interceptor
Caching is itself a considerably broad and complex subject. Some configurations and nuances can significantly improve application performance or be the root of a significant number of problems when poorly implemented.
Angular documentation provides a comprehensive example of how to implement a caching interceptor. However, it can be overwhelming for the reader who is going through the first steps of implementing an interceptor. This section will provide a simplified version to explain how it works.
Angular interceptors can handle HTTP requests themselves without passing them through to the next request handler. We can take advantage of this feature by setting some requests in the cache to improve performance and user experience by reducing the number of times needed to travel to the server.
A simplified caching interceptor could be implemented as follows:
1 | import { |
Our cache is defined by a Map structure that will store a key-value pair. In our simplistic example, the cache will store a URL as the key and result of the response call to the sample API. We are only caching ‘GET’ requests since these are idempotent. This means that for the exact same input, no matter how many times a request is made, it should produce the same output.
1 | const cachedResponse = this.cache.get(request.url); |
We start by getting an existing cached response for the requested URL. When we have a cache hit, we return the response previously stored.
1 | return next.handle(request).pipe( |
We pass the request through to the server on a cache miss and store the response in the cache. This is possible because, as explained initially, interceptors can handle both HTTP requests and HTTP responses together.
A fully working example can be found here. The first time the button ‘Cached Request’ is clicked, it will perform a request to the API. This can be verified on the developer tools network panel. Any subsequent clicks on the button will not trigger any additional requests. This can be tested by clicking the ‘Clear Data’ button and then clicking the ‘Cached Request’ button again. Although the displayed data gets cleared and shows again, no new requests are made to the server API. After the first request, all the others will return from the cache.
Logging Interceptor
Modern-day applications usually provide a significant number of features to the end-users. The more complex these applications are, the more error-prone they can become. Collecting meaningful data from an entire HTTP operation or specific properties from user data will allow insightful and dynamic thinking on producing some valuable statistics. These can measure the average request elapsed time for detecting potential bottlenecks or logging requests input data for detecting malformed requests that are triggering unexpected responses. There are hundreds of other valuable scenarios where logging could be helpful.
For this example, we will use the implementation provided on Angular documentation and break it down:
1 | import { |
1 | const started = Date.now(); |
We start by defining the moment the request was intercepted and a variable to store the outcome of the backend server response.
1 | tap({ |
Since interceptors can handle both an outgoing request and an incoming response, let’s store the outcome in our previously defined variable. Depending on the backend server returning a success or an error, the variable will print either ‘succeeded’ or ‘failed’.
1 | finalize(() => { |
The finalize method always executes, independently of the observable returning a success or an error response. This will then be the perfect place to calculate how long the request took in total and, for this example, to create a message with the elapsed time and the response status.
A fully working example can be found here. By clicking the ‘Cached Request’ button, it will log in to the console the time elapsed for the request and the status.
The curious reader will attempt to click the button several times, but no more logs will be displayed on the console. Why is this happening? As a hint, try to look at the ‘app.module’ file and see how the interceptors are declared and in which order. Does the order make any difference? Try placing the logging interceptor before the caching interceptor and observe the results.
Error Handling Interceptor
Errors from an API response to an HTTP call are never desirable for any application. Nevertheless, the best way of dealing with them is to assume they can (and will happen) and provide an elegant way to handle them. Failed requests can happen for many reasons, and the last thing an end-user would want to receive is a broken view or a considerable number of errors being displayed.
An elegant solution can be implemented by creating an error handler to intercept all HTTP errors.
1 | import { |
There’s not much explanation needed since the code should be self-explanatory. The only detail that is important to discuss is filtering the errors. We are only dealing with errors in which the HTTP response is different from 401.
Why is this? At the beginning of this article, I mentioned that it is possible to have multiple interceptors, executing them in a chained process. Since we already have the auth interceptor coping with all the 401 errors and processing those requests, there’s no point in managing them on this interceptor also.
When an error is received, this example merely displays a toast with the error message to the user, but this would be the perfect place to format or create customized notifications based on specific errors.
Conclusion
Angular 4.3 simplified everyone’s lives by adding the HTTP interceptors to the HTTP client library. The ability to handle outgoing requests and incoming responses in the same place together opened many possibilities such as the ones discussed and demonstrated above.
The examples provided are only the tip of the iceberg of all possibilities. The main goal was to show the reader how to implement and cope with the most standard use cases around any modern-day application.
The critical concepts are that interceptors can handle incoming and outgoing requests, can transform them by creating a new mutated request, and can themselves return without passing the request to the next interceptor. The latter should probably be used sparingly, but it’s essential to know it can be done.


Comments