We just launched Dev Academy Podcast šŸŽ™ļø
Discover expert talks with industry leaders
LISTEN ON SPOTIFY

Vue Design Patterns

Whatā€™s up, #VueFriends? Itā€™s time for another Vue article. Today we will put into practice some vue design patterns dispersed on the Internet, but in this case, we pick some of the most useful to apply together with our beloved and great framework. Letā€™s go!

Table of contents

Why do we need design patterns?

A design pattern is a general, reusable solution to a commonly occurring problem within a given context in software design. Thatā€™s the purpose of design patterns, maybe you may find the solution to a given problem on your own, but today I want to show you some easier ways in Vue šŸ˜Ž.

Builder Pattern

If exists something cannot be missing in a web app, it is the forms, forms everywhere! Forms are boring and more if there is no way to generate them programmatically. Itā€™s a common mistake to write files/components like UserForm.vue, ContactForm.vue, LoginForm.vue, and others with a similar logic inside.

Thatā€™s OK if your application has few forms, but what happens if your application has more than 20 or 100 forms? šŸ˜µ. With some time, even naming them tends to get harder and harder. Think about the above scenario. How times do you write the <input> element, validations, styles, and bindings? So, donā€™t pray more šŸ˜€ here is the Builder Pattern!

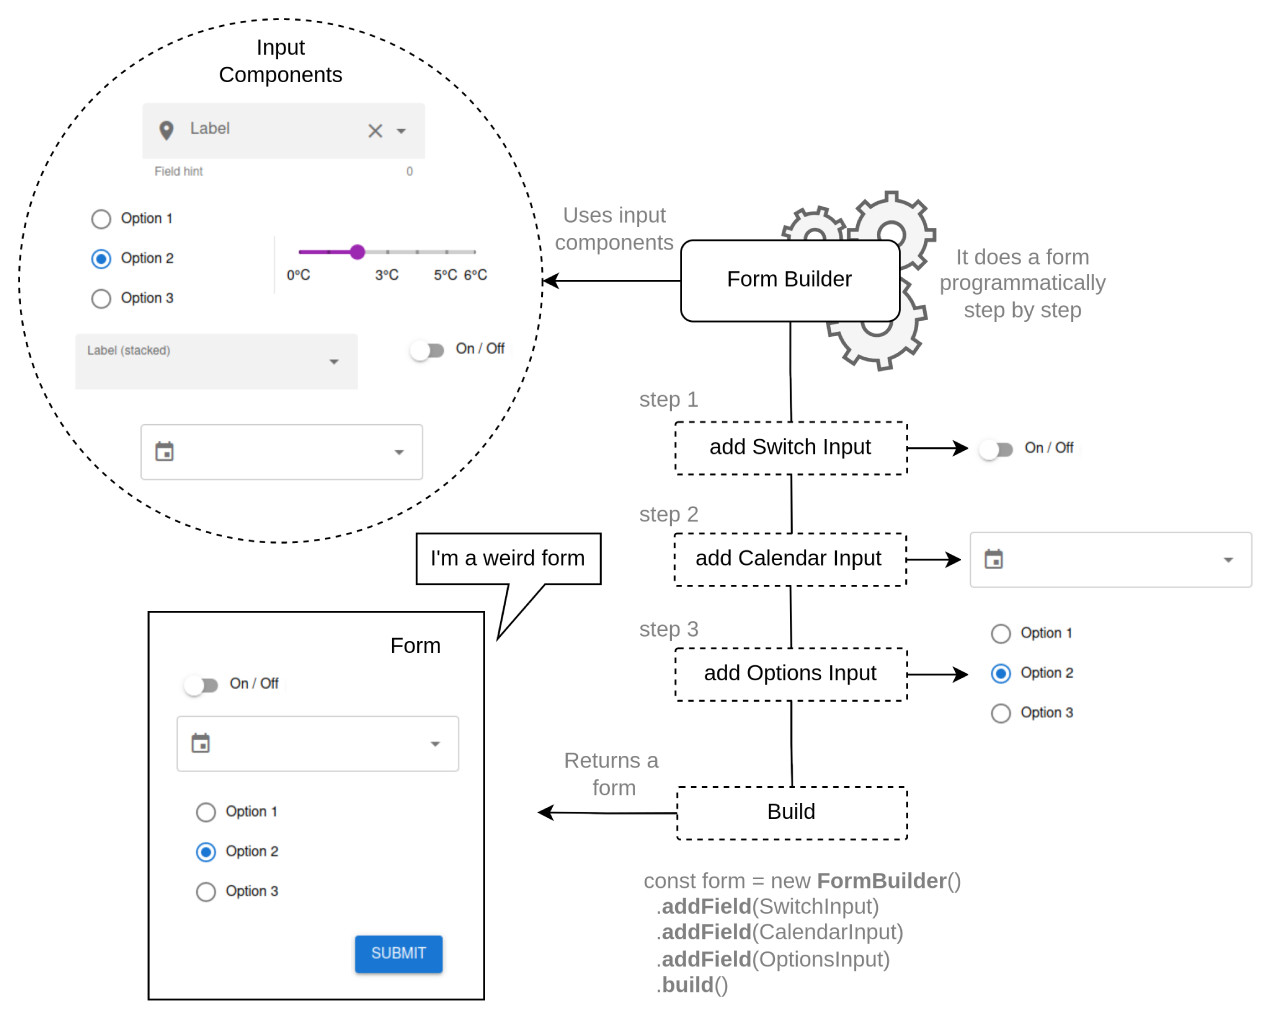
Builder is a creational design pattern that allows you to build complex object step by step. These patterns produce different types and representations of an object using the same construction code. Think about our case: we need to construct a form builder. Forms have many fields and submit button (maybe a cancel button too). One field means one kind of input, label, and error message. All fields have this structure and have an order.

First, we need to create the FormBuilder object as follows.

FormBuilder.ts
1
2
3
4
5
6
7
8
9
10
11
12
13
14
15
16
17
18
19
20
21
22
23
24
25
26
27
28
29
30
31
32
33
34
35
36
37
38
39
40
41
42
43
44
45
46
import { defineComponent, h, type VNode } from "vue";
import FormFactory from "./FormFactory.vue";

export interface ObjectGeneric {
[keys: string]: any;
}

export interface Field {
component: any;
type: string;
label?: string;
name: string;
props?: ObjectGeneric;
attrs?: ObjectGeneric;
validation?: any;
}

export default class FormBuilder {
fields: Field[];
provider: any;

constructor() {
this.fields = [];
}

addField(field: Field) {
this.fields.push(field);
return this;
}

build() {
const Fields = this.fields;

return defineComponent({
props: {
id: {
default: null,
type: String || Number,
},
},
render(): VNode {
return h(FormFactory, { fields: Fields, id: this.id });
},
});
}
}

We need some structure to put all the fields in order. An array is enough (we are using Typescript, this approach adds more code). The methodĀ addField,Ā as its name says, only has the task of putting an object Field to the fields array. The magic happens in theĀ buildĀ method. It defines a new Vue instance with all our fields well structured.

Up to here, what we want is similar to the following schematic image.

Builder pattern schema

Letā€™s continue, What is theĀ FormFactoryĀ task? Itā€™s responsible for structuring the form (many kinds of forms). Here is the code:

FormFactory.vue
1
2
3
4
5
6
7
8
9
10
11
12
13
14
15
16
17
18
19
20
21
22
23
24
25
26
27
28
29
30
31
32
33
34
35
36
37
38
39
40
41
42
43
44
45
46
47
48
49
50
51
52
53
54
55
56
57
58
59
60
61
62
63
64
65
66
67
68
69
70
71
72
73
74
75
76
77
78
79
80
81
82
83
84
85
86
87
88
89
90
91
92
93
94
95
96
97
98
99
100
101
102
103
104
105
106
107
108
109
110
111
112
113
114
115
116
117
118
119
120
121
122
123
124
125
<template>
<form action="" @submit.prevent="submit">
<div v-for="(field, index) in fields" :key="field.name">
<label :for="field.name" class="label">
{{ field.label }}
</label>
<component
:id="field.name"
:is="field.component"
:type="field.type"
v-bind="{ ...field.props, ...field.attrs }"
:model-value="field.props?.value"
@update:modelValue="onChangeHandler($event, field.name, index)"
/>
<div class="error" v-if="errors[field.name]">
{{ errors[field.name] }}
</div>
</div>
<button type="submit" :disabled="!submitable">Submit</button>
<br />
<br />
<pre>{{ values }}</pre>
</form>
</template>

<script lang="ts">
import { defineComponent, type PropType } from "vue";
import { ZodError } from "zod";
import type { Field, ObjectGeneric } from "./FormBuilder";

export interface ValidationResult {
valid: boolean;
message?: string;
}

export interface DataStructure {
values: ObjectGeneric;
errors: ObjectGeneric;
}

export default defineComponent({
props: {
id: {
type: [String, Number],
default: null,
},
fields: {
type: Array as PropType<Field[]>,
default: () => [],
},
},
data(): DataStructure {
return {
errors: {},
values: {},
};
},
computed: {
submitable() {
const errors: number = [...Object.keys(this.errors)].filter(
(i) => this.errors[i] != undefined
).length;
return errors === 0;
},
},
created() {
const values: any = {};
this.fields.forEach(({ name, props }) => {
if (props?.value != undefined) {
values[name] = props.value;
}
});
this.values = values;
},
methods: {
validate(value: string, validator: any): ValidationResult {
try {
validator.parse(value);
} catch (error) {
if (error instanceof ZodError) {
return {
valid: false,
message: error.issues[0].message,
};
}
}
return {
valid: true,
};
},
async submit() {
for (const { name, validation } of this.fields) {
const { valid, message } = this.validate(this.values[name], validation);
this.throwErrors(name, valid, message);
}
if (this.submitable) {
console.log("submit!!!");
}
},
throwErrors(
fieldName: string,
valid: boolean,
message: string | undefined
) {
if (!valid) {
this.errors = {
...this.errors,
[fieldName]: message,
};
} else {
this.errors = {
...this.errors,
[fieldName]: undefined,
};
}
},
onChangeHandler(payload: any, fieldName: string, fieldNumber: number) {
const validator = this.fields[fieldNumber].validation;
const { valid, message } = this.validate(payload, validator);
this.throwErrors(fieldName, valid, message);
this.values[fieldName] = payload;
},
},
});
</script>

Maybe it isnā€™t the ideal Form Builder, but itā€™s useful. The more complex your form type, the more complex your form builder will be. Now you have a Form Builder, which you can use to create forms in each view, but we have one step more, theĀ FormDirector.Ā It has the task of structuring our forms in a single file with verbose methods, likeĀ makeLoginForm(),Ā makeSignUpForm(),Ā makeShopForm(), and more. Here is ourĀ FormDirector.ts.

FormDirector.ts
1
2
3
4
5
6
7
8
9
10
11
12
13
14
15
16
17
18
19
20
21
22
23
24
25
26
27
28
29
30
31
32
33
34
import VInput from "@/components/form/VInput.vue";
import type FormBuilder from "./FormBuilder";
import z from "zod";

export default class FormDirector {
builder: FormBuilder;
constructor(builder: FormBuilder) {
this.builder = builder;
}
makeLoginForm() {
return this.builder
.addField({
component: VInput,
name: "username",
type: "text",
label: "username",
props: {
value: "",
},
validation: z.string().min(10).max(40),
})
.addField({
component: VInput,
name: "password",
type: "password",
label: "password",
props: {
value: "default password",
},
validation: z.string().min(10),
})
.build();
}
}

To validate our forms, we are using theĀ zodĀ library. As we can see,Ā makeLoginForm()Ā uses the Form Builder class to create a new app form with a detailed description of each field.

Code: Ā vue design pattern repository, execute, and go toĀ /builder-patternĀ route šŸ˜Ž.

Adapter Pattern

The adapter pattern is a structural design pattern also known asĀ ā€œWrapperā€.Ā This pattern allows the interfacing of an existing class used as another interface, like something in the middle of a connection. The perfect real-world example is when you go to another country, you realize that the power plug is different. So, you will need an adapter to get power. Thatā€™s the magic.

A typical use case is to wrap a 3rd party library, which is used everywhere in your code. Someday, many libraries will be deprecated, or in the worst case, security issues, also known as vulnerabilities. To learn more about it, we have an amazing academy,Ā https://websecurity-academy.com/, and a free guide related toĀ Vue Security Best Practices.

In this case, we are using theĀ js-cookieĀ library to interact directly with our Cookies, which is simple and lightweight. The adapter looks like this.

CookiesAdapter.ts
1
2
3
4
5
6
7
8
9
10
11
12
13
14
15
16
17
18
19
20
21
22
23
24
25
26
27
28
29
30
31
32
33
34
35
36
37
38
import Cookies from "js-cookie";

export interface CookieOptions {
expires?: number | Date | undefined;
path?: string | undefined;
domain?: string | undefined;
secure?: boolean | undefined;
sameSite?: "strict" | "lax" | "none" | undefined;
[property: string]: any;
}

export default class CookiesAdapter {
cookies;

constructor() {
this.cookies = Cookies;
}

get(key: string): string | undefined {
return this.cookies.get(key);
}

getAll(): object {
return this.cookies.get();
}

set(
key: string,
value: string,
options: CookieOptions | undefined = undefined
): string | undefined {
return this.cookies.set(key, value, options);
}

remove(key: string) {
this.cookies.remove(key);
}
}

If one day we will need to replace the 3rd party library or add more features, it will be fast, and many parts of your code wonā€™t be affected by this change, as we can see in the following schematic image.
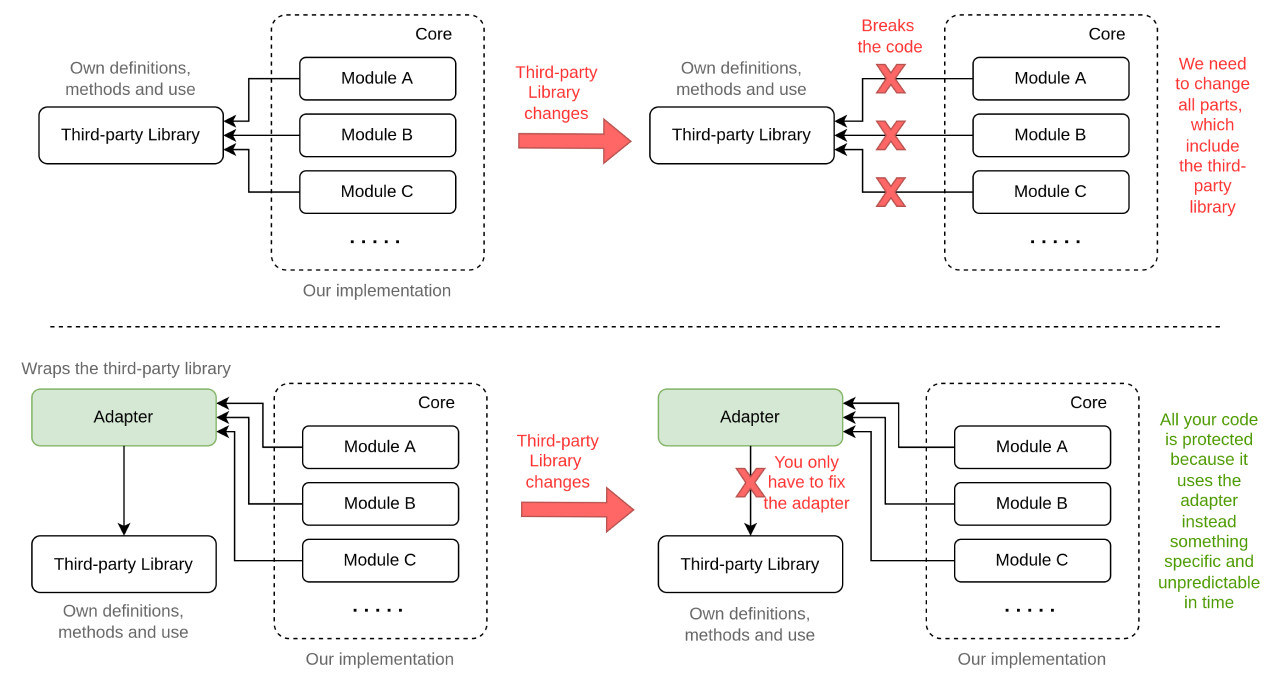
Adapter pattern schema

Letā€™s think about another situation: You have an extensive web application with dozens of elements from some UI material library/framework (like Vuetify). Tomorrow, the business requirements change to adopt Quasar because of the long-term support. You have picked some elements from Vuetify, and now itā€™s time to change it šŸ˜Ø. But this scenario happens and could be acceptable, but as time goes on, technologies improve, and again a change is needed. What tedious work. The solution? Create your adapter inputšŸ˜Ž.

Container/Presentational Pattern

Maybe you are using this design pattern right now, itā€™s simple, and thatā€™s the point. Vue and other modern frameworks have two parts where you can put the code, the presentational layer and the business logic layer. Those are known as concerns, and generally isnā€™t convenient to mix them up, but it doesnā€™t mean that one canā€™t use the other, and this is where Container or Presentational Pattern lands.

Itā€™s time to imagine another scenario: You need a list of To-Do items. The easy way is to create a Vue SFC (Single File Component) to show all of them, something like this.

TodoList.vue
1
2
3
4
5
6
7
8
9
10
11
12
13
14
15
16
17
18
19
20
21
22
23
24
25
26
27
28
29
30
31
32
33
34
<template>
<div class="todo" v-for="(todo, index) in todos.slice(0, 10)" :key="index">
<span :class="['todo__title', todo.completed && 'todo__title--completed']">
{{ todo.title }}
</span>
<span class="todo__completed">
{{ todo.completed ? "šŸ‘" : "šŸ‘Ž" }}
</span>
</div>
</template>

<script lang="ts">
import { defineComponent, ref, type Ref } from "vue";

export interface Todo {
title: string;
completed: boolean;
}

export default defineComponent({
setup() {
const todos: Ref<Todo[]> = ref([]);
const getData = async () => {
const data = await fetch("https://jsonplaceholder.typicode.com/todos");
todos.value = await data.json();
};

getData();
return {
todos,
};
},
});
</script>

It works well, but what happens if we need to test this component all in one file the business logic layer (call to an API) is mixed with the presentational layer, so there is no way to reuse something and extract to test, sooner than later this type of code will need a refactoring. So, the Container Pattern helps us to decouple the presentational and business logic layer and turns to a testable application.

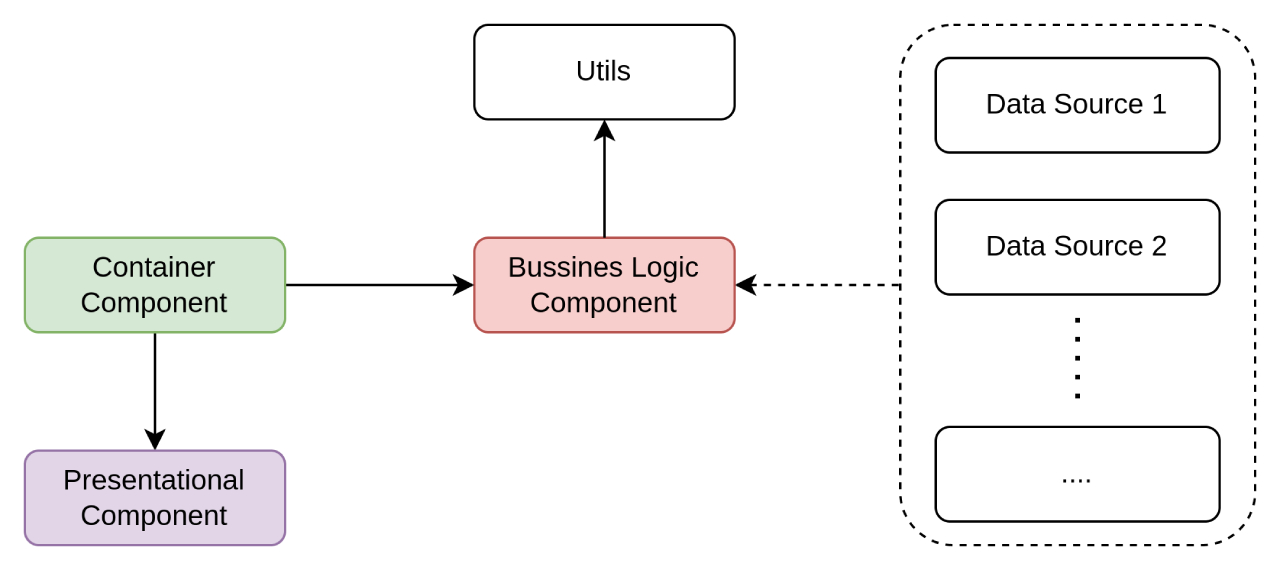
To take this pattern advantage, think of this file as three parts:

  • Presentational Component, this component only has the task of receiving data through props, event bus, injection, state management system, or another to present this data visually.
  • Business Logic Component/fileĀ has the task of fetching the data from somewhere (APIs commonly) to share with any component or file which needs it. It acts like an action administrator of all the actions registered on the presentational component.
  • Container ComponentĀ handles the interaction of the presentational component and the business logic component. In our case, this component calls some method to get the To-Dosā€™ information and will pass that data on to the presentational component as props.Container pattern schema

So, itā€™s time to implement the code, first theĀ Business Logic Component:

todo.ts
1
2
3
4
5
6
7
8
9
10
11
12
13
14
15
16
17
18
19
20
21
22
23
24
25
26
27
28
29
30
31
import type { StoreOptions } from "vuex";

export interface Todo {
title: string;
completed: boolean;
}

export interface TodoStoreProps {
list: Todo[];
}

const store: StoreOptions<TodoStoreProps> = {
state(): TodoStoreProps {
return {
list: [],
};
},
mutations: {
UPDATE_LIST(state, list: Todo[]) {
state.list = list;
},
},
actions: {
async getList({ commit }) {
const data = await fetch("https://jsonplaceholder.typicode.com/todos");
commit("UPDATE_LIST", await data.json());
},
},
};

export default store;

TheĀ todo.tsĀ is a Vuex store definition with an API call inside. Disponible to any component which needs the list of to-dos.

TheĀ Presentational ComponentĀ calledĀ VList.vueĀ looks like this.

VList.vue
1
2
3
4
5
6
7
8
9
10
11
12
13
14
15
16
17
18
19
20
21
22
23
24
<template>
<div class="todo" v-for="(item, index) in data.slice(0, 10)" :key="index">
<span :class="['todo__title', item.completed && 'todo__title--completed']">
{{ item.title }}
</span>
<span class="todo__completed">
{{ item.completed ? "šŸ‘" : "šŸ‘Ž" }}
</span>
</div>
</template>

<script lang="ts">
import type { Todo } from "@/store/vuex/todo";
import { defineComponent, type PropType } from "vue";

export default defineComponent({
props: {
data: {
type: Array as PropType<Todo[]>,
default: () => [],
},
},
});
</script>

No matter the source, the data enters through props to display a list of beautiful To-Dos āœØ.

Finally, the Container Component has the principal mission of calling the data from the Business Logic Component and passing the to-do data to display to the Presentational Component. Here is the code.

TodoContainer.vue
1
2
3
4
5
6
7
8
9
10
11
12
13
14
15
16
17
18
19
20
21
<template>
<TodoList :data="data" />
</template>

<script lang="ts">
import { computed, defineComponent } from "vue";
import { useStore } from "vuex";
import TodoList from "./VList.vue";

export default defineComponent({
components: { TodoList },
setup() {
const todoStore = useStore();
todoStore.dispatch("todo/getList");

return {
data: computed(() => todoStore.state.todo.list),
};
},
});
</script>

Code: Ā vue design pattern repository, execute, and go toĀ /container-patternĀ route šŸ˜Ž.

Provide/Inject Pattern

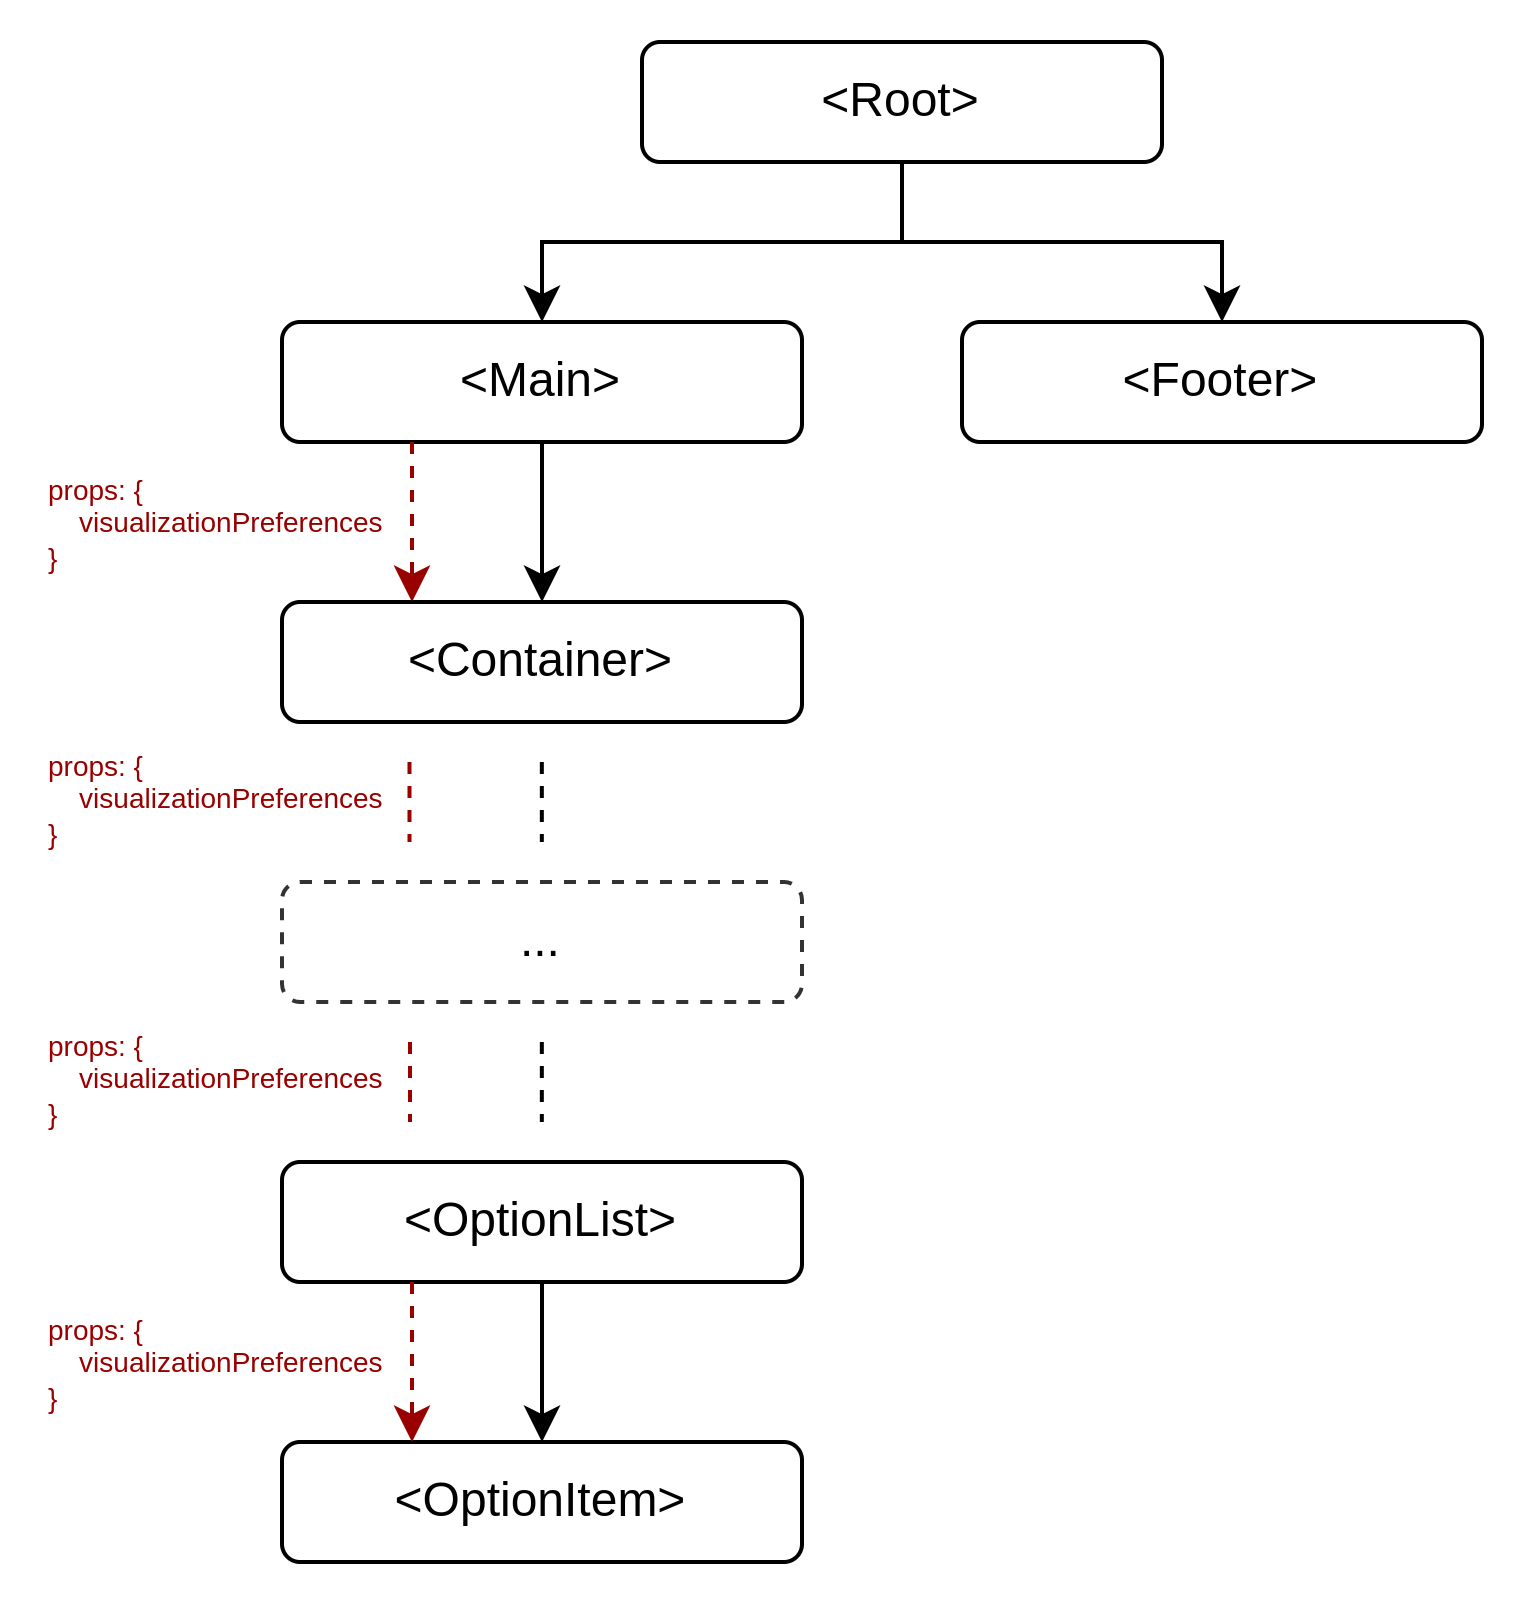
There is another interesting design pattern. When we start with Vue, most of us make the mistake of passing information through props between multiple components, as the image shows.
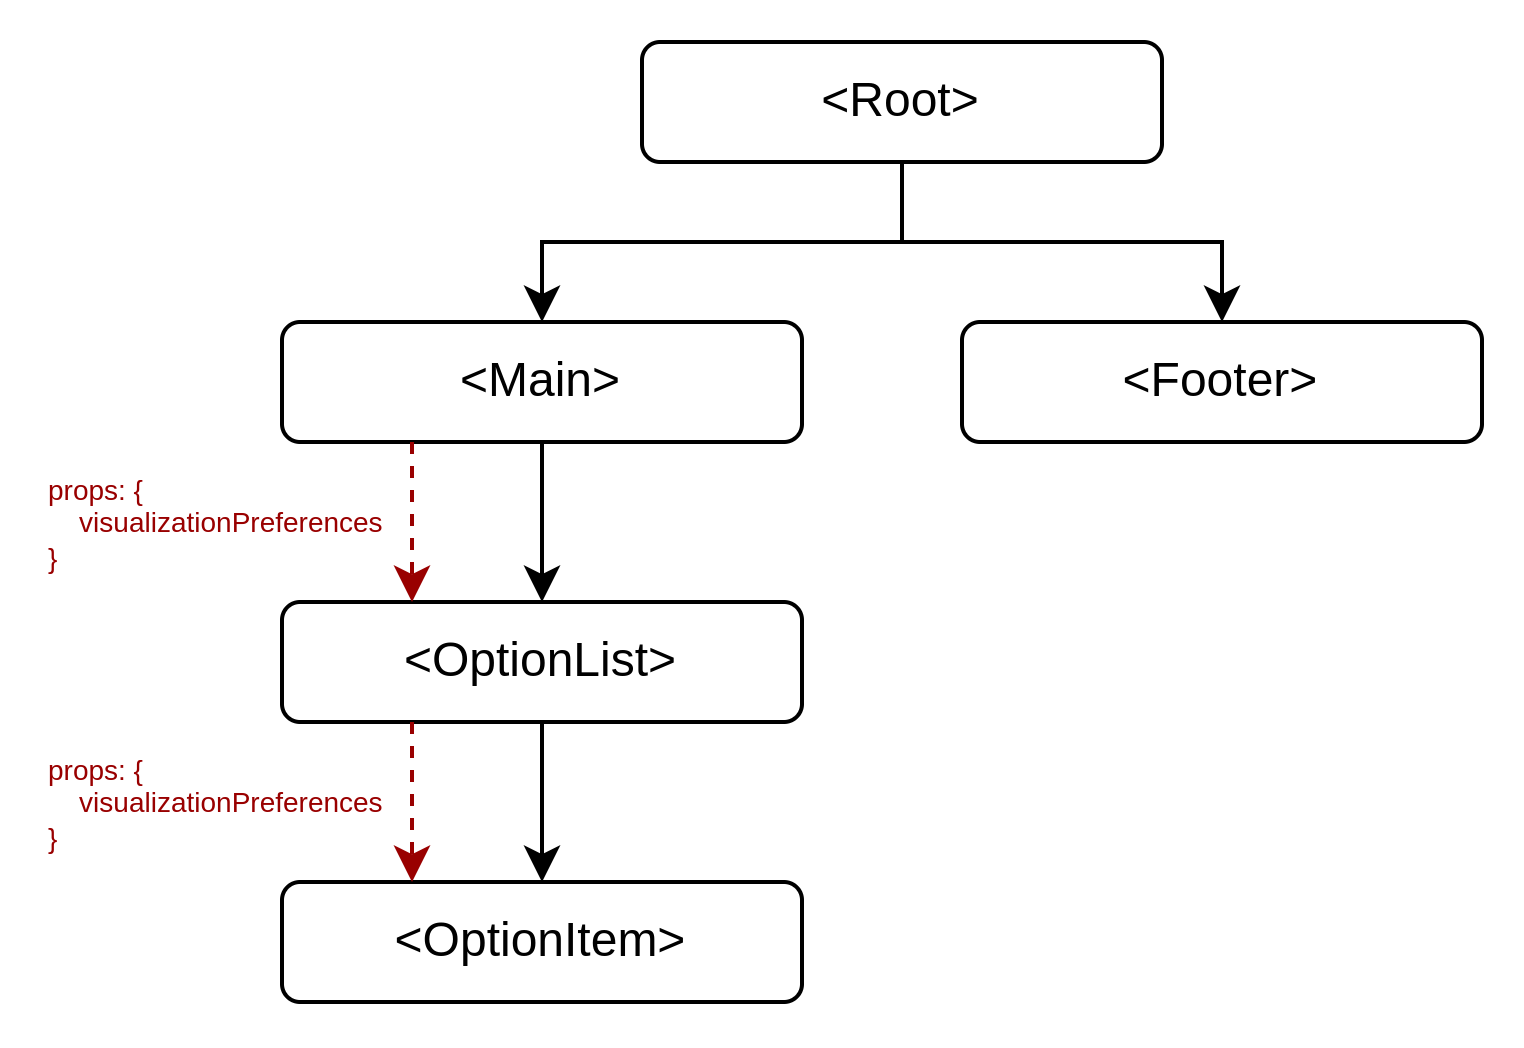
This image was adapted from vuejs.org official documentation

Ideally, theĀ OptionListĀ component should only renderĀ OptionItem, but with this approach, it containsĀ visualizationPreferencesĀ as one of its props. It can still work without much trouble, but what if you must go through many components to get to the component that will use that property? Many of those components donā€™t need a new prop, only to fit with one component at the bottom of the hierarchy (a child component).

props drilling, anti-pattern

That problem is known asĀ props drillingĀ (an anti-pattern). Fortunately, Vue has the solution build-in with itsĀ provide()Ā andĀ inject()Ā features, better known as dependency injection.
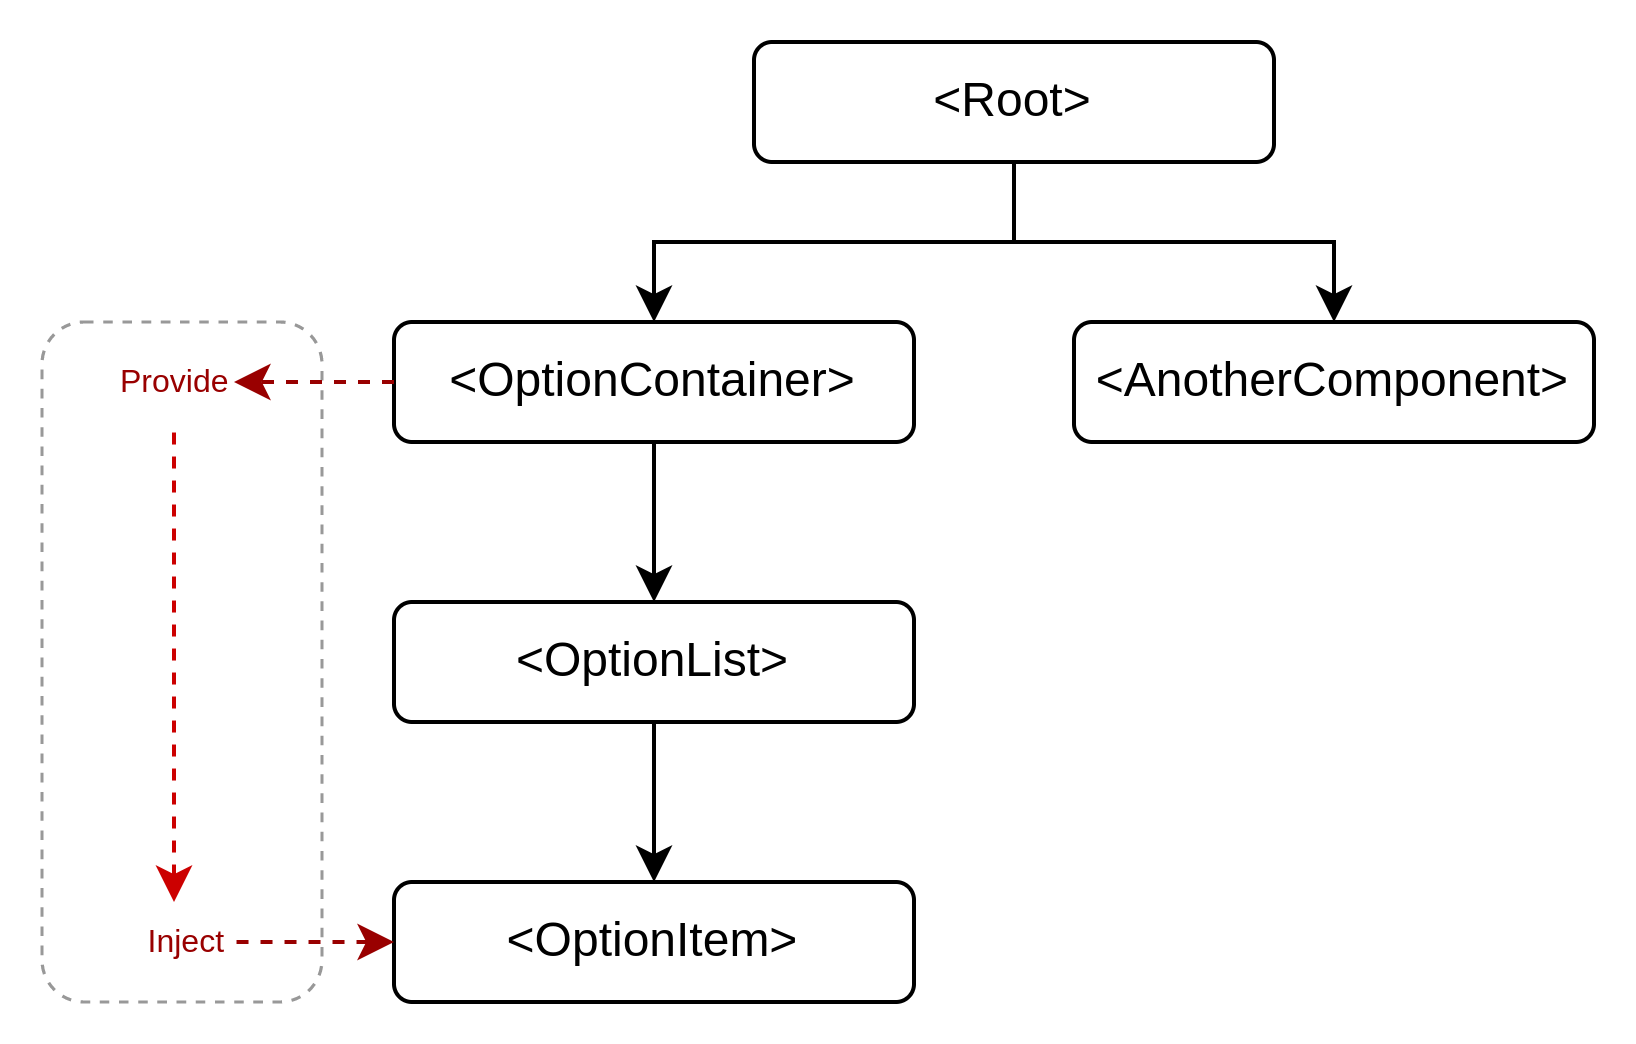
Using the provide/inject feature from Vue

As we can see in the image above,Ā ProvideĀ gets the data and is responsible for passing it when it is needed to beĀ InjectedĀ in all the components down the hierarchy (in this caseĀ OptionItem).

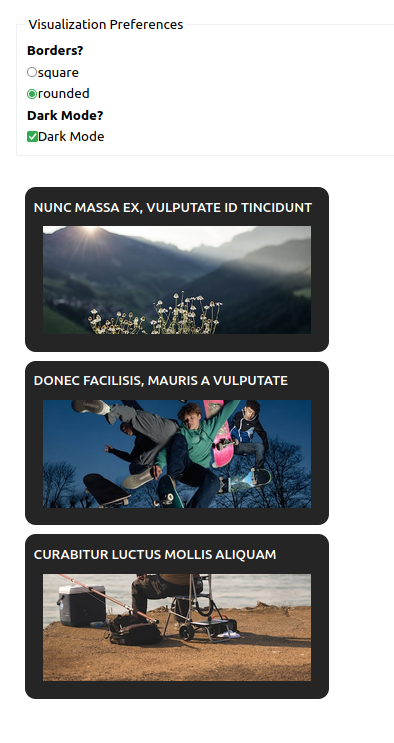
The following case shows a list of cards (with a title and image inside). We need to change the card appearance usingĀ provide()Ā andĀ inject(). Those cards have four styles: rounded, squared borders, and dark and light themes. This pattern is ideal for implementing more cards along the same behavior.

Provide/Inject design pattern example, vue patterns

So, to implement this feature, we need to create the image structure in the code, beginning withĀ OptionItem.vue.

OptionItem.vue
1
2
3
4
5
6
7
8
9
10
11
12
13
14
15
16
17
18
19
20
21
22
23
24
25
26
27
28
29
30
31
32
33
34
35
36
37
38
39
40
41
42
43
44
45
<template>
<div
class="option"
:class="[`option--${boders}`, darkMode && 'option--dark']"
>
<div :class="['option__title', darkMode && 'option__title--dark']">
{{ title }}
</div>
<div class="option__image">
<img :src="image" :alt="title" />
</div>
</div>
</template>

<script lang="ts">
import { defineComponent, inject } from "vue";
import { VISUALIZATION_PREFERENCES } from "./OptionSymbols";

export interface OptionProps {
title: string;
image: string;
}

export default defineComponent({
props: {
title: {
type: String,
default: undefined,
},
image: {
type: String,
default: undefined,
},
},
setup() {
// The important part šŸ‘‡
const injection = inject(VISUALIZATION_PREFERENCES);

return {
darkMode: injection?.darkMode,
boders: injection?.borders,
};
},
});
</script>

OptionItem.vueĀ pretends to be a card with a title and a random image inside.

OptionItem.vue Component

TheĀ setup()Ā uses theĀ inject()Ā method to retrieve (inject) the data from theĀ provider()Ā method, to be used inĀ OptionContainer.vueĀ (two components above in the hierarchy).Ā 

To inject that data inside the component, we need a key. In this case,Ā VISUALIZATION_PREFERENCESĀ is anĀ InjectionKey.Ā Its use makes sense with Typescript. It allows you to define a key name and structure for a specific data structure. TheĀ VISUALIZATION_PREFERENCESĀ is in theĀ OptionSymbols.tsĀ file for re-usability purposes.

OptionSymbols.ts
1
2
3
4
5
6
7
8
9
10
import type { InjectionKey } from "vue";

export interface VisualizationPreferences {
darkMode: boolean;
borders: "square" | "rounded";
}

export const VISUALIZATION_PREFERENCES: InjectionKey<
VisualizationPreferences | any
> = Symbol("visualizationPreferences");

The next component implemented isĀ OptionList.vue, which works as a Presentational Component (only renders everyĀ OptionItemĀ component if it has the necessary data, it is only a dummy component).

OptionList.vue
1
2
3
4
5
6
7
8
9
10
11
12
13
14
15
16
17
18
19
20
21
22
23
<template>
<div v-for="({ title, image }, index) in data" :key="index">
<OptionItem :title="title" :image="image" />
</div>
</template>

<script lang="ts">
import { defineComponent, type PropType } from "vue";
import OptionItem, { type OptionProps } from "./OptionItem.vue";

export default defineComponent({
components: { OptionItem },
props: {
data: {
type: Array as PropType<OptionProps[]>,
default: () => [],
},
},
setup() {
return {};
},
});
</script>

Now, theĀ OptionContainer.vueĀ is the Provider. It contains the data to pass toĀ OptionItem.vueĀ through theĀ provide()Ā method, as we can see below.

OptionContainer.vue
1
2
3
4
5
6
7
8
9
10
11
12
13
14
15
16
17
18
19
20
21
22
23
24
25
26
27
28
29
30
31
32
33
34
35
36
37
38
39
40
<script lang="ts">
import { computed, defineComponent, provide, reactive } from "vue";
import type { OptionProps } from "./OptionItem.vue";
import OptionList from "./OptionList.vue";
import {
VISUALIZATION_PREFERENCES,
type VisualizationPreferences,
} from "./OptionSymbols";

export default defineComponent({
components: { OptionList },
setup() {
const preferences = reactive<VisualizationPreferences>({
borders: "square",
darkMode: false,
});
const data = reactive<OptionProps[]>([
{
title: "Nunc massa ex, vulputate id tincidunt",
image: "https://random.imagecdn.app/500/200#1",
},
{
title: "Donec facilisis, mauris a vulputate",
image: "https://random.imagecdn.app/500/200#12",
},
{
title: " Curabitur luctus mollis aliquam",
image: "https://random.imagecdn.app/500/200#33",
},
]);
// The important part šŸ‘‡
provide(VISUALIZATION_PREFERENCES, {
darkMode: computed(() => preferences.darkMode),
borders: computed(() => preferences.borders),
});

return { data, preferences };
},
});
</script>

The code is large (this is the script part only). TheĀ provide()Ā method receives the sameĀ VISUALIZATION_PREFERENCESĀ seen previously as the first parameter, and the data to be injected as a second parameter (we are usingĀ computed()Ā to turn reactive that data).

Many people use this pattern without the reactive feature, but it is great to have.

Code: Ā vue design pattern repository, execute, and go toĀ /provide-inject-patternĀ route šŸ˜Ž.

Composables

If you are coming from React, this reactive pattern could be familiar. Yes, we are talking aboutĀ hooks, but in Vue, they are called ā€œComposablesā€; hooks and composables are component patterns. According to theĀ official documentationĀ of Vue, a ā€œcomposableā€ is a function that leverages Vueā€™s Composition API to encapsulate and reuse stateful logic. Stateful logic involves a managing state that changes over time.

Letā€™s take advantage of the previous example explained in the Adapter Pattern. We have the classĀ CookiesAdapterĀ which wraps theĀ js-cookie library. CookiesAdapter could be used directly in our code, but now we will add state and covert to a Composable, to see the cookiesā€™ body reactively.

useCookies.ts
1
2
3
4
5
6
7
8
9
10
11
12
13
14
15
16
17
18
19
20
21
22
23
24
25
26
27
28
29
30
31
32
33
import { ref, type Ref } from "vue";
import CookiesAdapter from "./CookiesAdapter";
import type CookieOptions from "./CookiesAdapter";

export default function useCookies() {
const cookie = new CookiesAdapter();
const cookies: Ref<object> = ref(cookie.getAll());

const update = () => {
cookies.value = cookie.getAll();
};

const get = (key: string): string | undefined => {
return cookie.get(key);
};

const set = (
key: string,
value: string,
options: CookieOptions | undefined = undefined
): string | undefined => {
const response = cookie.set(key, value, options);
update();
return response;
};

const remove = (key: string) => {
cookie.remove(key);
update();
};

return { cookies, get, set, remove };
}

TheĀ ref()Ā methodĀ is a function that gives reactivity to a variable,Ā cookies.Ā In this case, when we talk about composables, we are directly talking about state and action exposure. This composable exposes three actions:Ā get(),Ā set(), andĀ remove(); those do the same thing as theĀ CookiesAdapterĀ methods but are necessary to share through components as a composable, the same withĀ cookiesĀ which is the general state of our Cookies. The trick behind theĀ update()Ā method synchronizes theĀ cookiesā€™Ā state every time an action is called.

Now, we can use it everywhere.

ComposablePatternView.vue
1
2
3
4
5
6
7
8
9
10
11
12
13
14
15
16
17
18
19
20
21
22
23
24
25
26
27
28
29
30
31
32
33
34
35
36
37
38
39
40
41
<template>
<h4>Add Cookies</h4>
<input type="text" name="key" v-model="key" placeholder="Introduce a key" />
<input
type="text"
name="value"
v-model="value"
placeholder="Introduce a value"
/>
<button @click="set(key, value)">Add/Update Cookie</button>
<br />

<h4>Remove Cookies</h4>
<select name="cookies" v-model="selectedKey">
<option v-for="cookieKey in keys" :key="cookieKey" :value="cookieKey">
{{ cookieKey }}
</option>
</select>
<button @click="remove(selectedKey)">Remove Cookie</button>
<br />
<br />

<pre>{{ cookies }}</pre>
</template>

<script lang="ts">
import useCookies from "@/utils/useCookies";
import { computed, defineComponent, ref } from "vue";

export default defineComponent({
setup() {
const { get, set, remove, cookies } = useCookies();
const selectedKey = ref(Object.keys(cookies.value)[0] || "");
const key = ref("");
const value = ref("");
const keys = computed(() => Object.keys(cookies.value));

return { key, value, keys, selectedKey, get, set, remove, cookies };
},
});
</script>

Many people use this pattern without the reactive feature, but it is great to have.

cookie editor with Vue, ui components (Composables pattern)

This cookie composable is cool, but if you donā€™t want to reinvent the wheel, the Vue ecosystem has many composition functions on the hand of VueUse and vue-composable libraries.

Code: Ā vue design pattern repository, execute, and go toĀ /composable-patternĀ route šŸ˜Ž.

State Management Pattern

State management is a crucial part of our web apps. In Vue, we have two great libraries to handle the state. To explain those libraries, we have the following case: We want to show to-do items in a list, to-do items retrieved from an open API (https://jsonplaceholder.typicode.com/todos). Similar to the case exposed in the Container Pattern section, we will reuse theĀ VList.vueĀ component. Now, we only need to think about how to use both state management libraries.

Vuex/Pinia

Accordingly, with the officialĀ documentationĀ of Vuex, it serves as a centralized store for all component in an application, with rules ensuring the state, which can be mutated predictably. The following code shows a Vuex store configured to manage to-dos.

todo.ts
1
2
3
4
5
6
7
8
9
10
11
12
13
14
15
16
17
18
19
20
21
22
23
24
25
26
27
28
29
import type { StoreOptions } from "vuex";
import type { Todo, TodoStoreProps } from "../types/todo";

const store: StoreOptions<TodoStoreProps> = {
state(): TodoStoreProps {
return {
list: [],
};
},
mutations: {
UPDATE_LIST(state, list: Todo[]) {
state.list = list;
},
ADD_ITEM(state, todo: Todo) {
state.list = [todo, ...state.list];
},
},
actions: {
async getList({ commit }) {
const data = await fetch("https://jsonplaceholder.typicode.com/todos");
commit("UPDATE_LIST", await data.json());
},
addTodo({ commit }, todo: Todo) {
commit("ADD_ITEM", todo);
},
},
};

export default store;

In contrast, we have the same implementation but powered by Pinia.

todo.ts
1
2
3
4
5
6
7
8
9
10
11
12
13
14
15
16
17
18
19
20
21
22
23
24
import type { Todo } from "./../types/todo";
import { defineStore } from "pinia";

export const useTodoStore = defineStore("todos", {
state: () => {
return {
list: [] as Todo[],
};
},
getters: {
getList: (store) => {
return store.list;
},
},
actions: {
addTodo(todo: Todo) {
this.list = [todo, ...this.list];
},
async fetchTodos() {
const data = await fetch("https://jsonplaceholder.typicode.com/todos");
this.list = await data.json();
},
},
});

The unique difference is that Pinia doesnā€™t need to define mutations. We need a new component and use the to-do store implemented above with Vuex.

VuexTodoList.vue
1
2
3
4
5
6
7
8
9
10
11
12
13
14
15
16
17
18
19
20
21
22
23
24
25
26
27
28
29
30
31
<template>
<TodoList :data="data" />
<button @click="addTodo">Add Todo</button>
</template>

<script lang="ts">
import { computed, defineComponent } from "vue";
import { useStore } from "vuex";
import TodoList from "./VList.vue";

export default defineComponent({
components: { TodoList },
setup() {
const todoStore = useStore();
todoStore.dispatch("todo/getList");

const addTodo = () => {
todoStore.dispatch("todo/addTodo", {
title:
"This is a random todo number " + Math.random().toFixed(2).toString(),
completed: Math.random() > 0.5 ? false : true,
});
};

return {
data: computed(() => todoStore.state.todo.list),
addTodo,
};
},
});
</script>

The Pinia version looks like this.

PiniaTodoList.vue
1
2
3
4
5
6
7
8
9
10
11
12
13
14
15
16
17
18
19
20
21
22
23
24
25
26
27
28
29
30
<template>
<TodoList :data="todoList" />
<button @click="addTodo">Add Todo</button>
</template>

<script lang="ts">
import { computed, defineComponent, onMounted } from "vue";
import { useTodoStore } from "@/store/pinia/todo";
import TodoList from "@/components/VList.vue";

export default defineComponent({
components: { TodoList },
setup() {
const store = useTodoStore();
const { fetchTodos, addTodo: newTodo } = store;
const todoList = computed(() => store.getList);

const addTodo = () => {
newTodo({
title:
"This is a random todo number " + Math.random().toFixed(2).toString(),
completed: Math.random() > 0.5 ? false : true,
});
};
onMounted(fetchTodos);

return { todoList, addTodo };
},
});
</script>

Both work well, but the superficial differences are few. But Pinia hides something really interesting. We are using Pinia as a Composable. Remember, the principal mission of this pattern is to manage and expose the state in a good way. Naturally, Pinia does that and fits in. but the Pinia approach has another advantage, Type friendly. We donā€™t need to point specific stores, actions, mutations, getters, or others via strings (a non-type friend); it happens in Vuex. In the past, that detail always caused me problems with the code. Instead, in Pinia, each state, action, or getter will be accessible directly from the source as aĀ useStoreSomething().Ā Pinia is the new by-default state management library for Vue. We recommend using it belong the composition API.

Code: Ā vue design pattern repository, execute, and go toĀ /store-management-patternĀ route šŸ˜Ž.

Summary

Writing this article was a big challenge for me. I hope these examples and guideline helps you to make the best architectural decisions. Getting motivated and up to date is hard. If you found it useful, donā€™t doubt to share this article with your #VueFriends.

I donā€™t want to say goodbye without first recommending the Lachlan Millerā€™sĀ bookĀ called ā€œDesign Pattern for Vue.js. A Test-driven Approach to maintainable Applicationsā€ which inspired me to write this article and the magnificentĀ conferenceĀ of Jacob Schatz (you will find more advanced patterns with Vue).

As we mentioned earlier, all the code is availableĀ here. Clone, execute, and enjoy it. Says goodbye, your #VueFriendĀ @cr0wg4n.

Subscribe to Dev Academy

Join over 6000 subscribers that receive latest knowledge and tips!

    By submitting this form you agree to receive emails with news, promotions and products and you accept Privacy Policy.